How to build React Native iOS app with GitHub Actions [2023]
GitHub Actions are a great way to incorporate DevOps and DevSecOps into mobile development. This post documents the steps to build a React Native iOS app with GitHub Actions (without using any 3rd party actions). Many of the steps will be the same as the previous post on “How to build an iOS app with GitHub Actions [2023]” so definitely check that out for a more complete explanation of the various steps below.
The basic steps are:
1. Code Setup
We’ll continue using the open source Joplin as our demo app. You’ll need to fork the repo and then clone to your computer. I’ve outlined the steps in a previous blog.
Change team, bundle_identifier and group for an iOS app
In order to build, sign and export Joplin, you’ll need to change a few identifiers so they are unique. Otherwise Apple will perform a lookup on the bundleidentifier and reject your build process. _Obviously if you are working on your own app, you don’t need to do the following!
First you’ll need a unique namespace. The convention is to use a domain name you own and then reverse it, e.g. com.andrewhoog. I guess if you don’t have your own domain, you could make up some unique value here.
You’ll also need an Apple Developer account Team ID (which you can find in the Membership details section on Apple’s Developer website ) and then Apple Development and Distribution certificates which are likely already created for you by Xcode. We’ll cover this more in the Configuration inputs section below.
Then, change the following files (all files relative to ~/spfexpert/joplin/packages/app-mobile/ios/). You can adapt the follow one-liner for each of the following: sed -i '' 's/A9BXAFS6CT/XW66E6M5N4/g' project.pbxproj
1. Joplin.xcodeproj/project.pbxproj
- change all 4 instances of
DEVELOPMENT_TEAM = A9BXAFS6CTto your Team ID - prepend all 4 instances of
PRODUCT_BUNDLE_IDENTIFIER = net.cozic.joplinwith your unique namespace, e.g.PRODUCT_BUNDLE_IDENTIFIER = com.andrewhoog.net.cozic.joplin
2. Joplin/Joplin.entitlements
- prepend your unique namespace after
group., e.g.<string>group.com.andrewhoog.net.cozic.joplin</string>
3. ShareExtension/ShareExtension.entitlements
- prepend your unique namespace after
group., e.g.<string>group.com.andrewhoog.net.cozic.joplin</string>
Make sure you commit those changes and push to GitHub:
$ git commit -a -m 'update app properties for build'
$ git push
2. Configuration inputs
In order to build and create an iOS app archive, we’ll need similar configuration inputs as covered in my previous post:
- Signing certificates (and a strong password to protect it)
- Mobile provisioning profiles for the app and each target (e.g. SharedExtensions)
- Keychain password for the build machine
- ExportOptions.plist
I found it easiest to store all of these files in a single directory, e.g.:
$ mkdir -p ~/spfexpert/ios-rn-deploy && cd $_
I’ve outlined each of these steps in details in the Configuration inputs section of my previous post (including a tip on how to figure out the correct signing certificate and provisioning profile) so check that out as needed.
2.1 Exporting multiple certificates in a single step
For Joplin, we’ll need two signing certificates: one to build the app and another to export the app as an Ah Hoc ipa. I learned you can select multiple certificates in Keychain Access and export them into a single Certificates.p12 file.
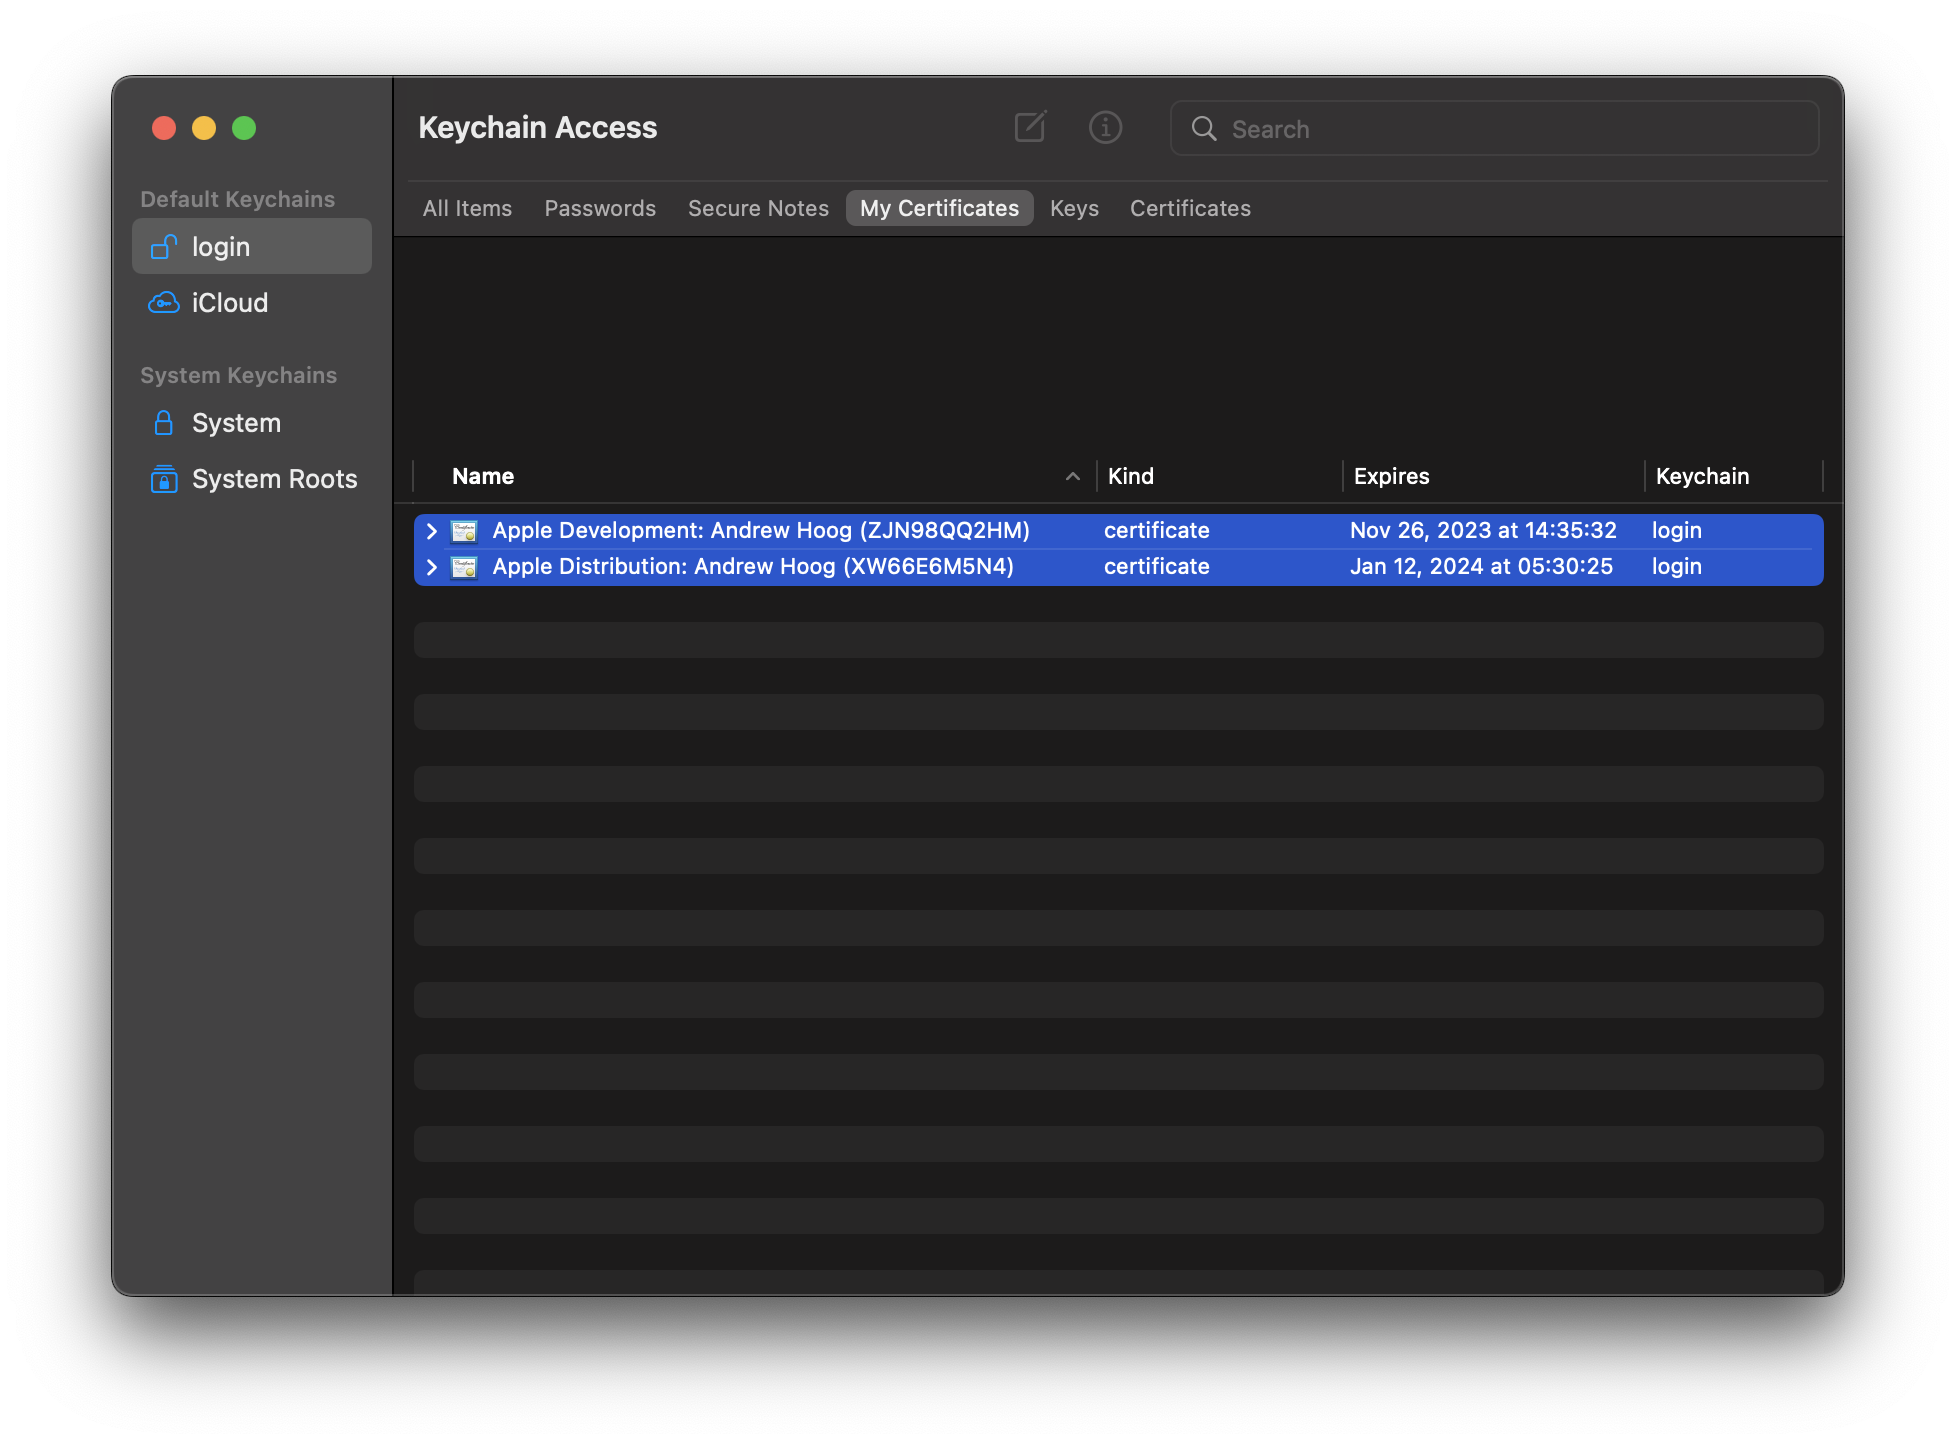 Once you’ve selected both/all certificates, just right-click, select export and then follow the prompt. A single Certificates.p12 will be exported but when we import them into the GitHub Actions macOS runner, all the certificates exported will be installed! In my example yaml workflow below, I validate this by running the
 security command:
$ security find-identity -v -p codesigning
and the following will show in the logs:
  1) 336EA5031BA8E411136D5250A73519E1C2D9A082 "Apple Development: Andrew Hoog (ZJN98QQ2HM)"
  2) 51DA2FBDEDECF138028A27EDA3B51E3161EE5FC5 "Apple Distribution: Andrew Hoog (XW66E6M5N4)"
     2 valid identities found
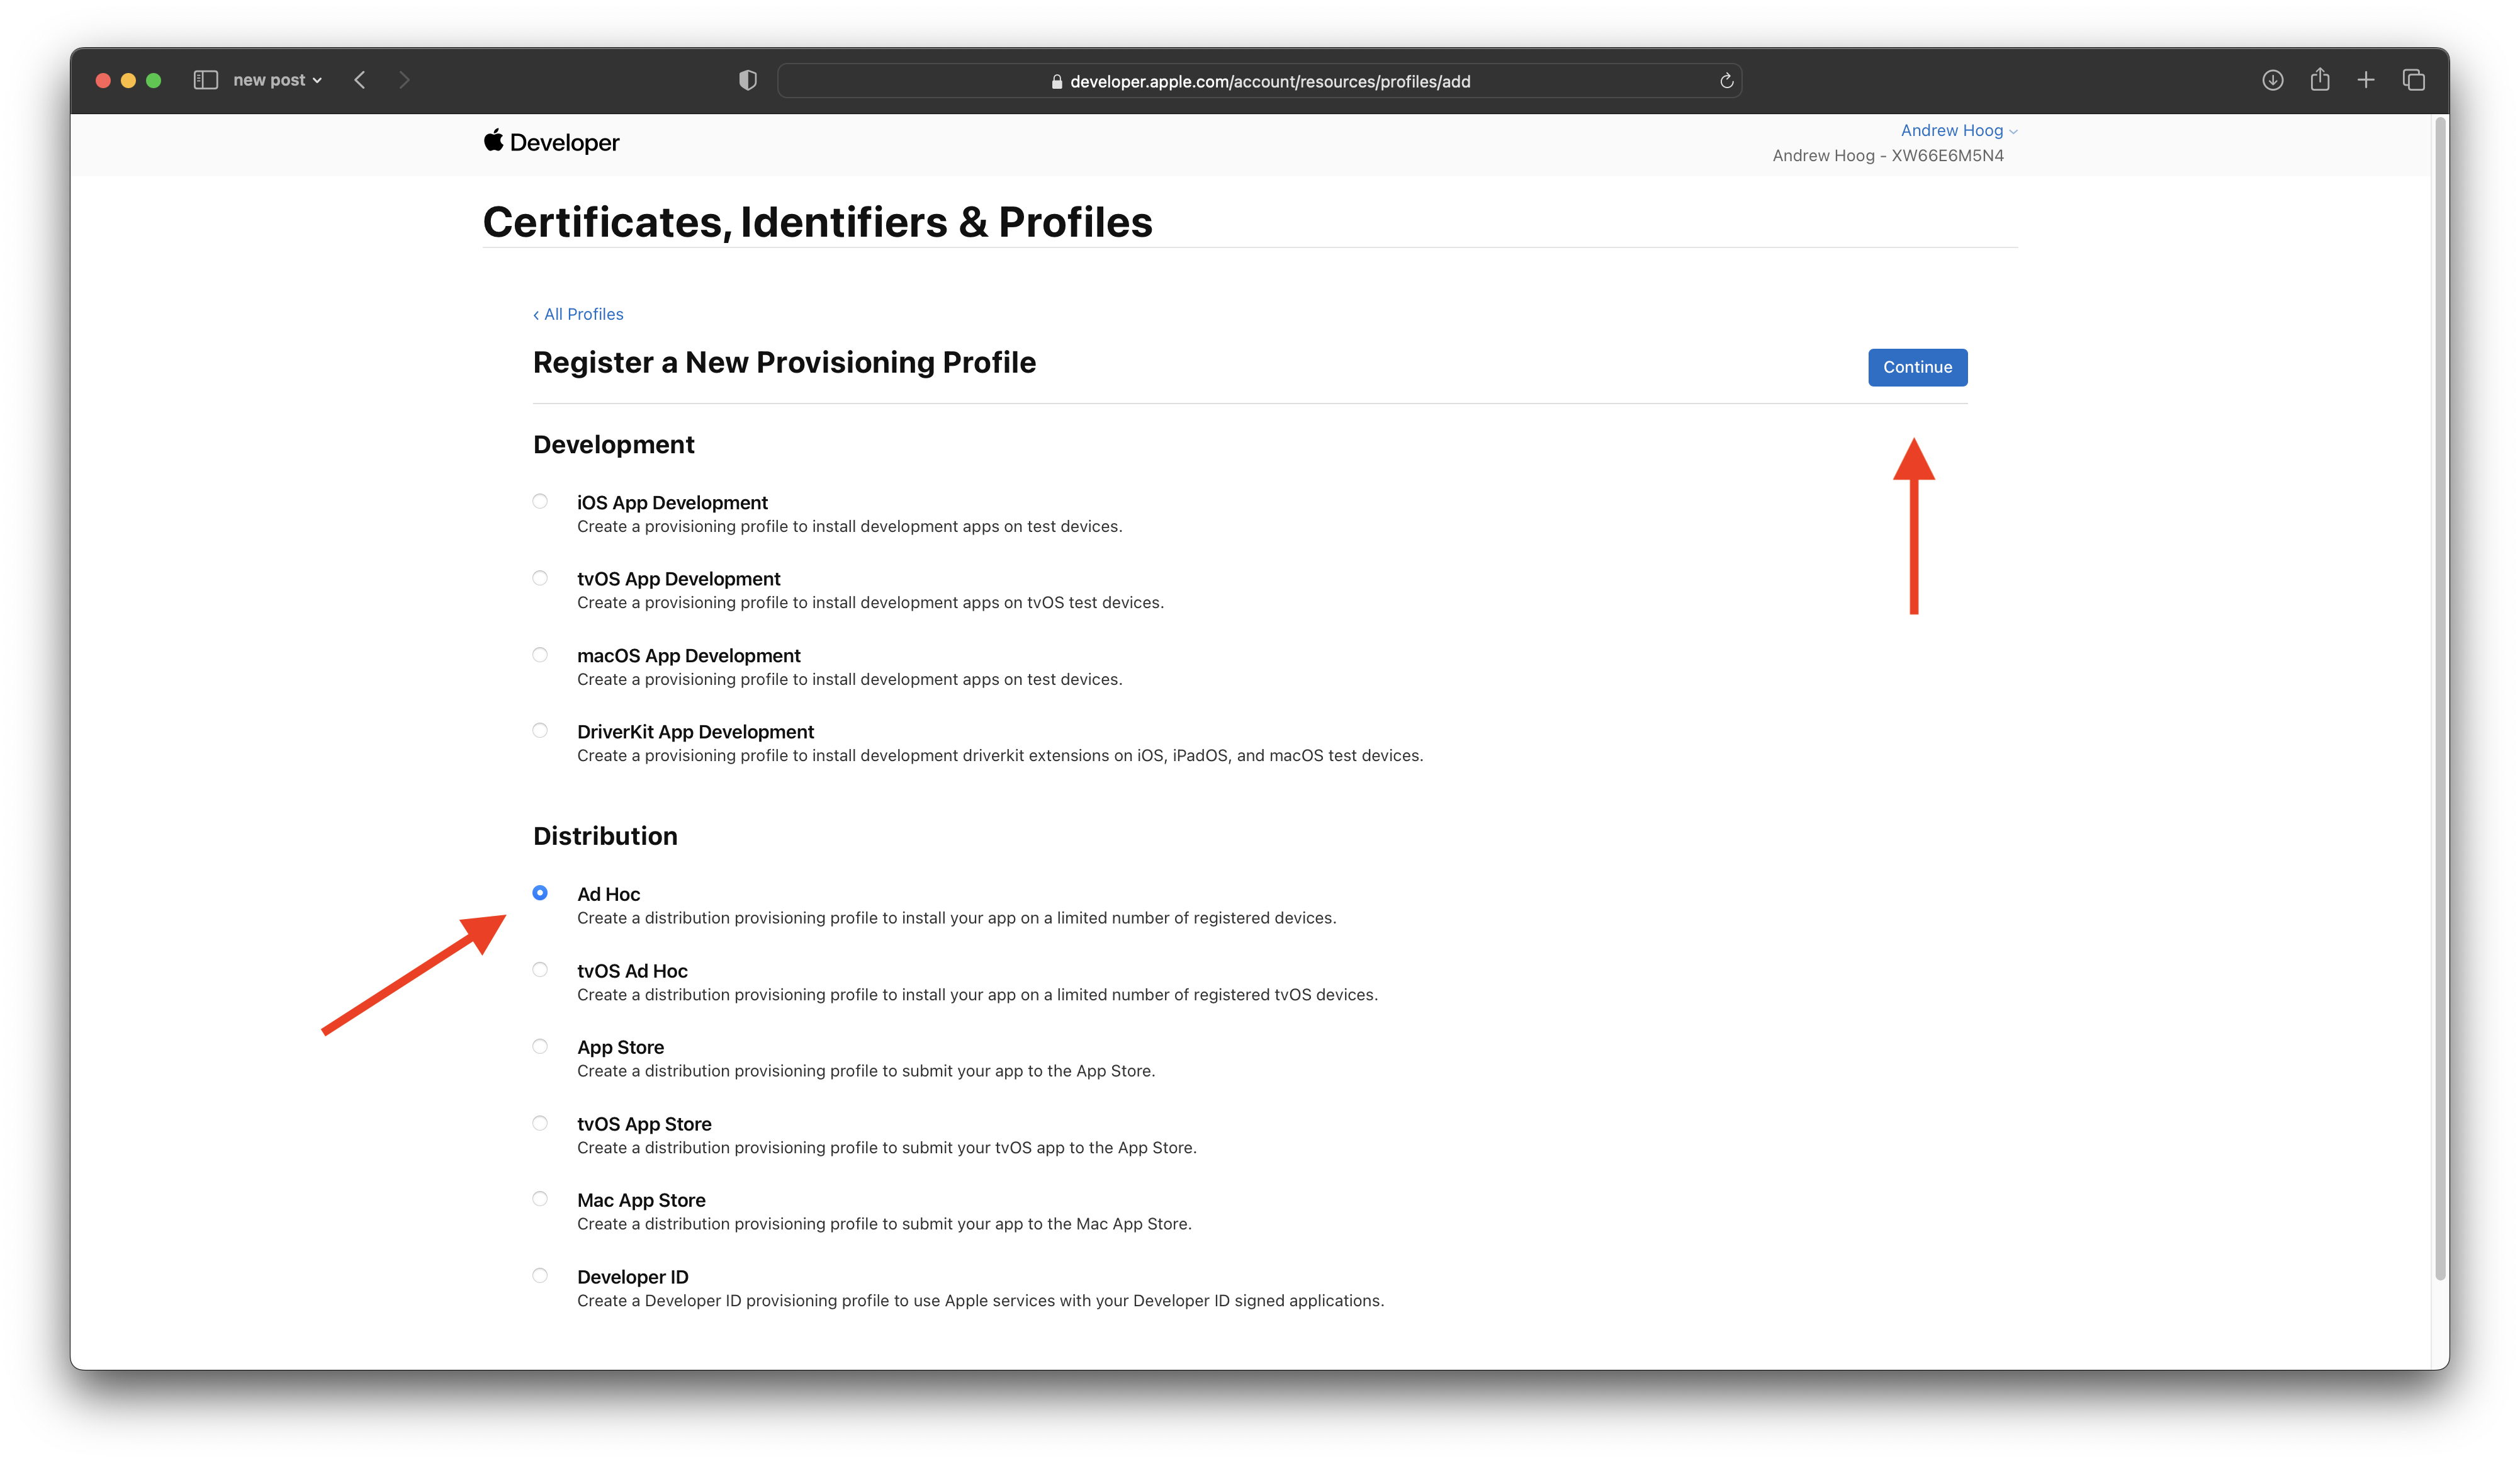
2.2 Manually create distribution provisioning profiles
While we can use the build log locally to determine the build provisioning profiles, we’ll have to manually create Ad-hoc distribution profiles to export the xarchive to an .ipa file.
To do that, I first compiled the app in Xcode with Automatically manage signing enabled so Xcode created several of the configuration files I needed. You’ll need to log into the Apple Developer website and then you can check out the App Identifiers:
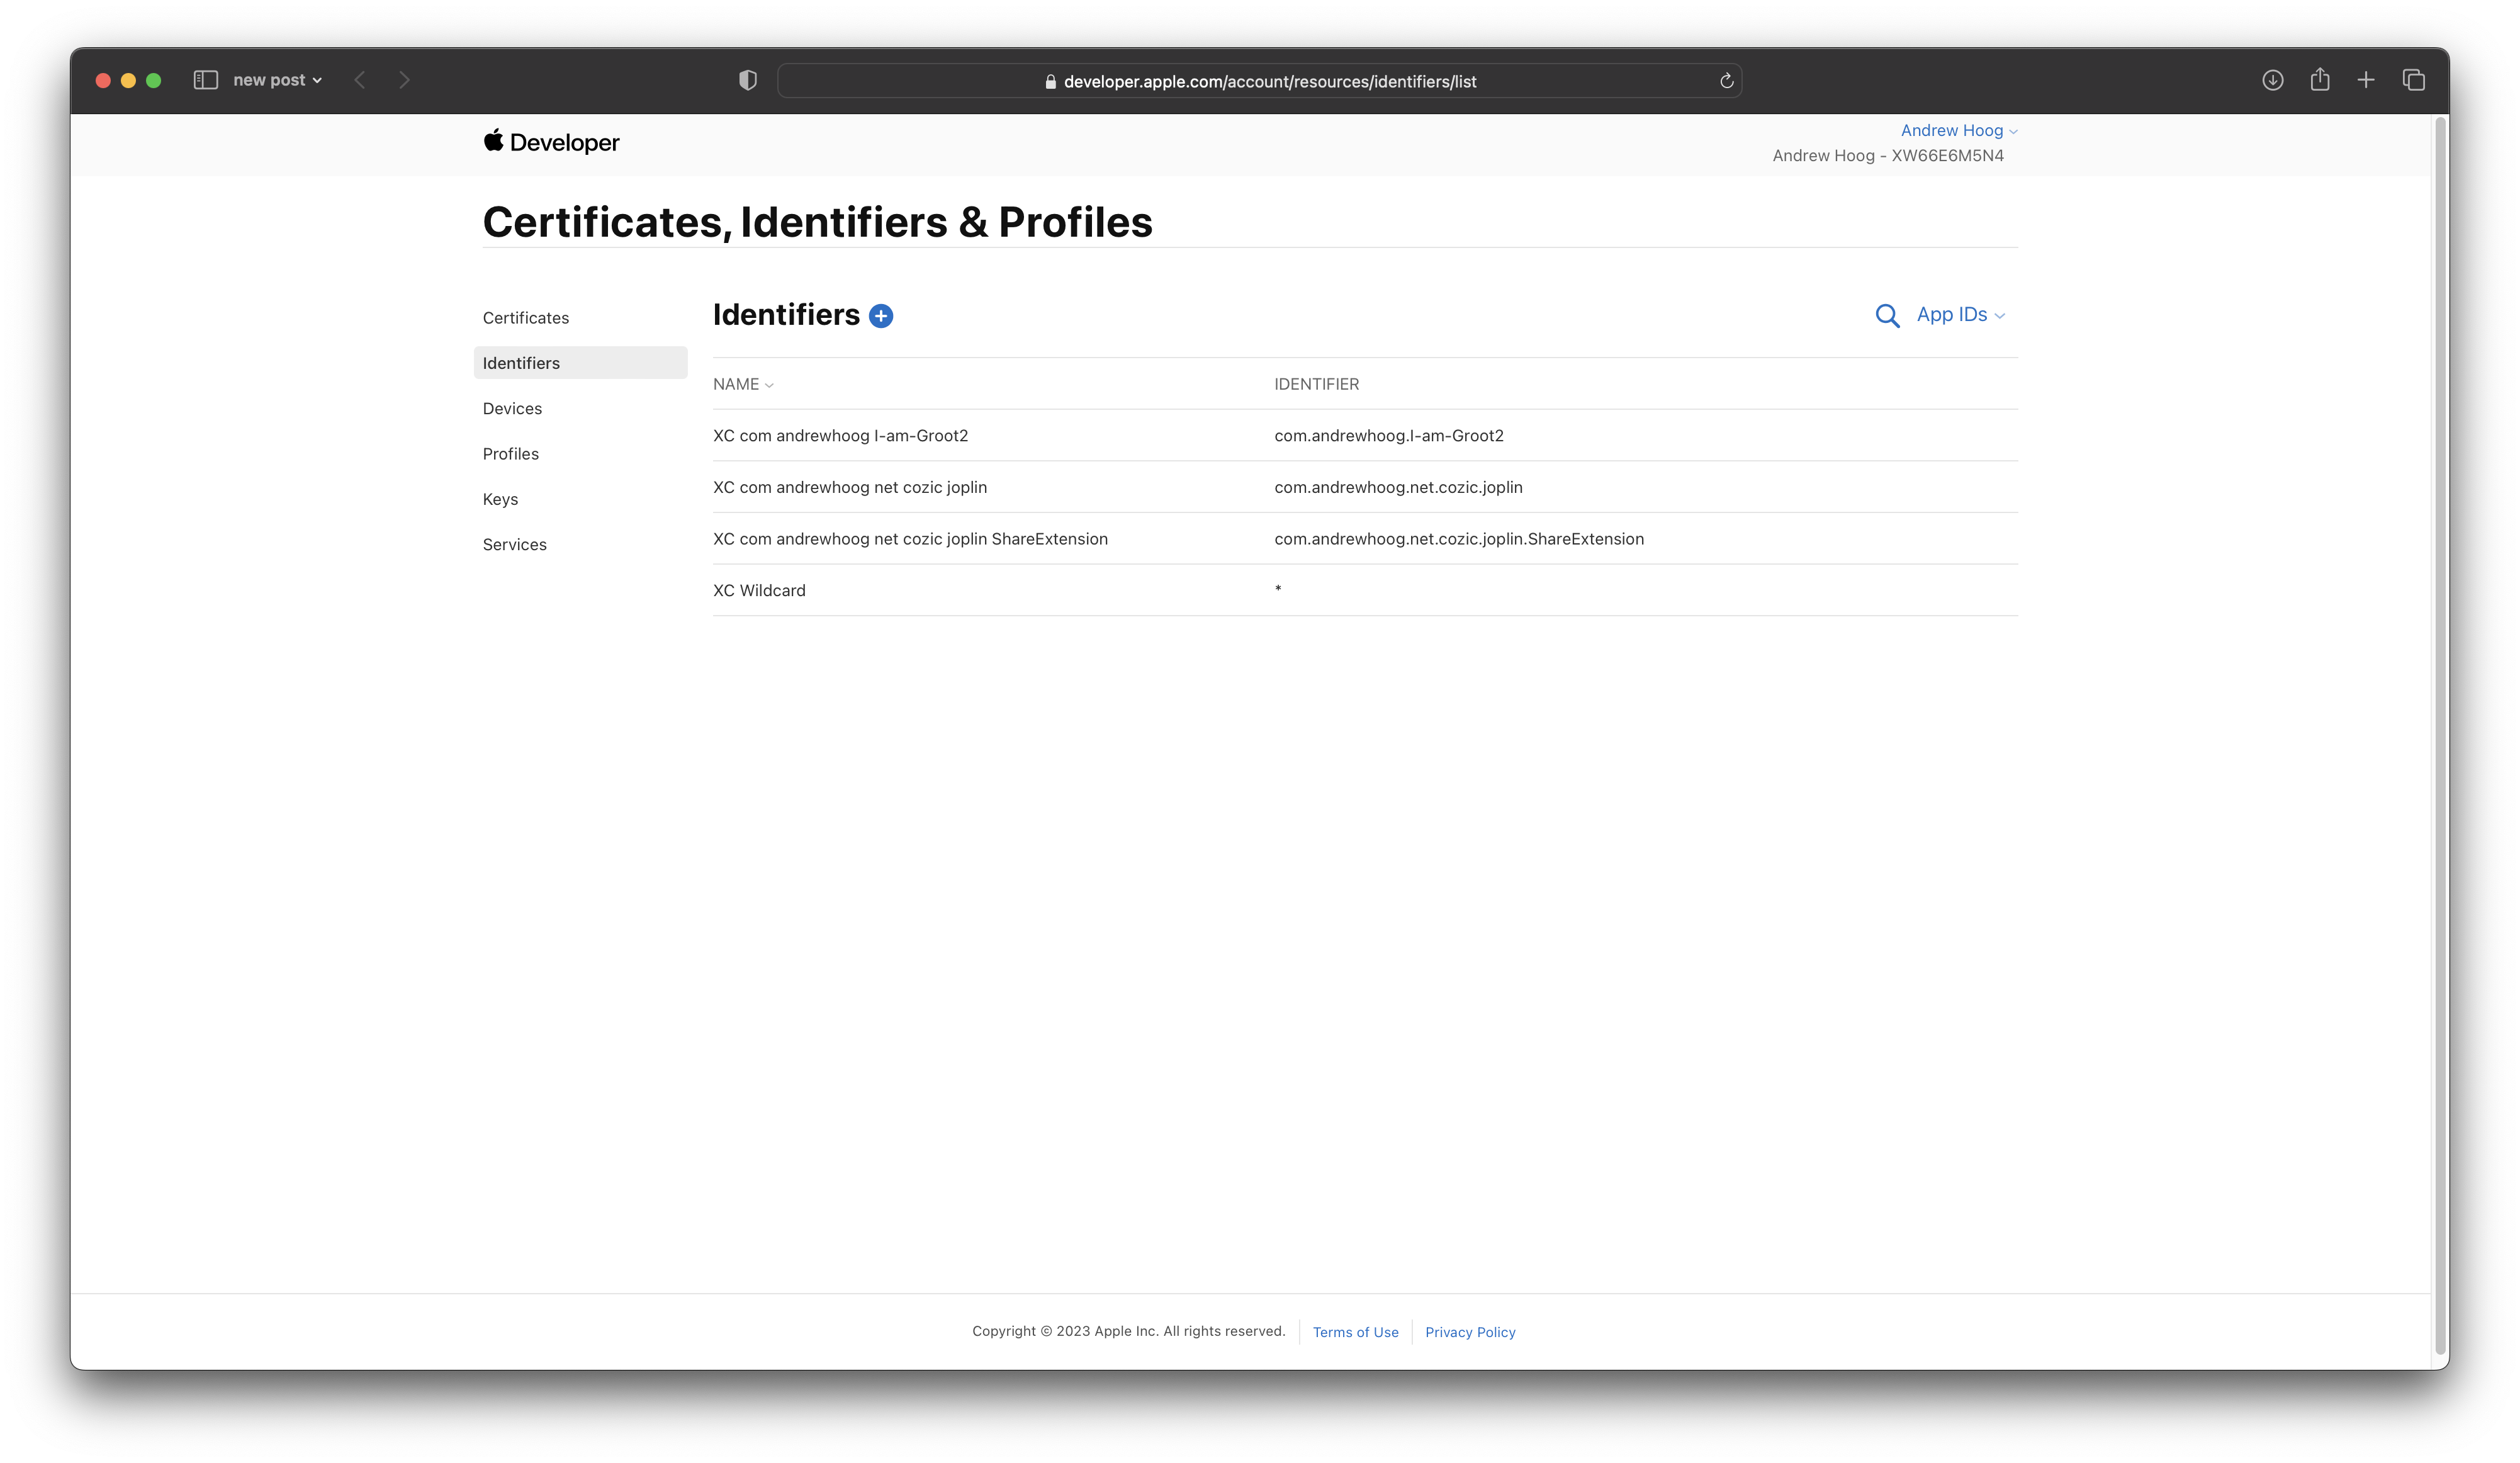 As you can see, the identifiers are prefaced with
 XC (I’m assuming because Xcode created them!) and we have 2 identifiers for Joplin:
- Joplin main app
- Joplin ShareExtension
If you don’t have these, you can just manually create them here for your version of Joplin.
Now we need to create the two Ad-hoc distribution profiles we’ll need to export to ipa. Click on Profiles, the + and select Ad Hoc and then Continue:
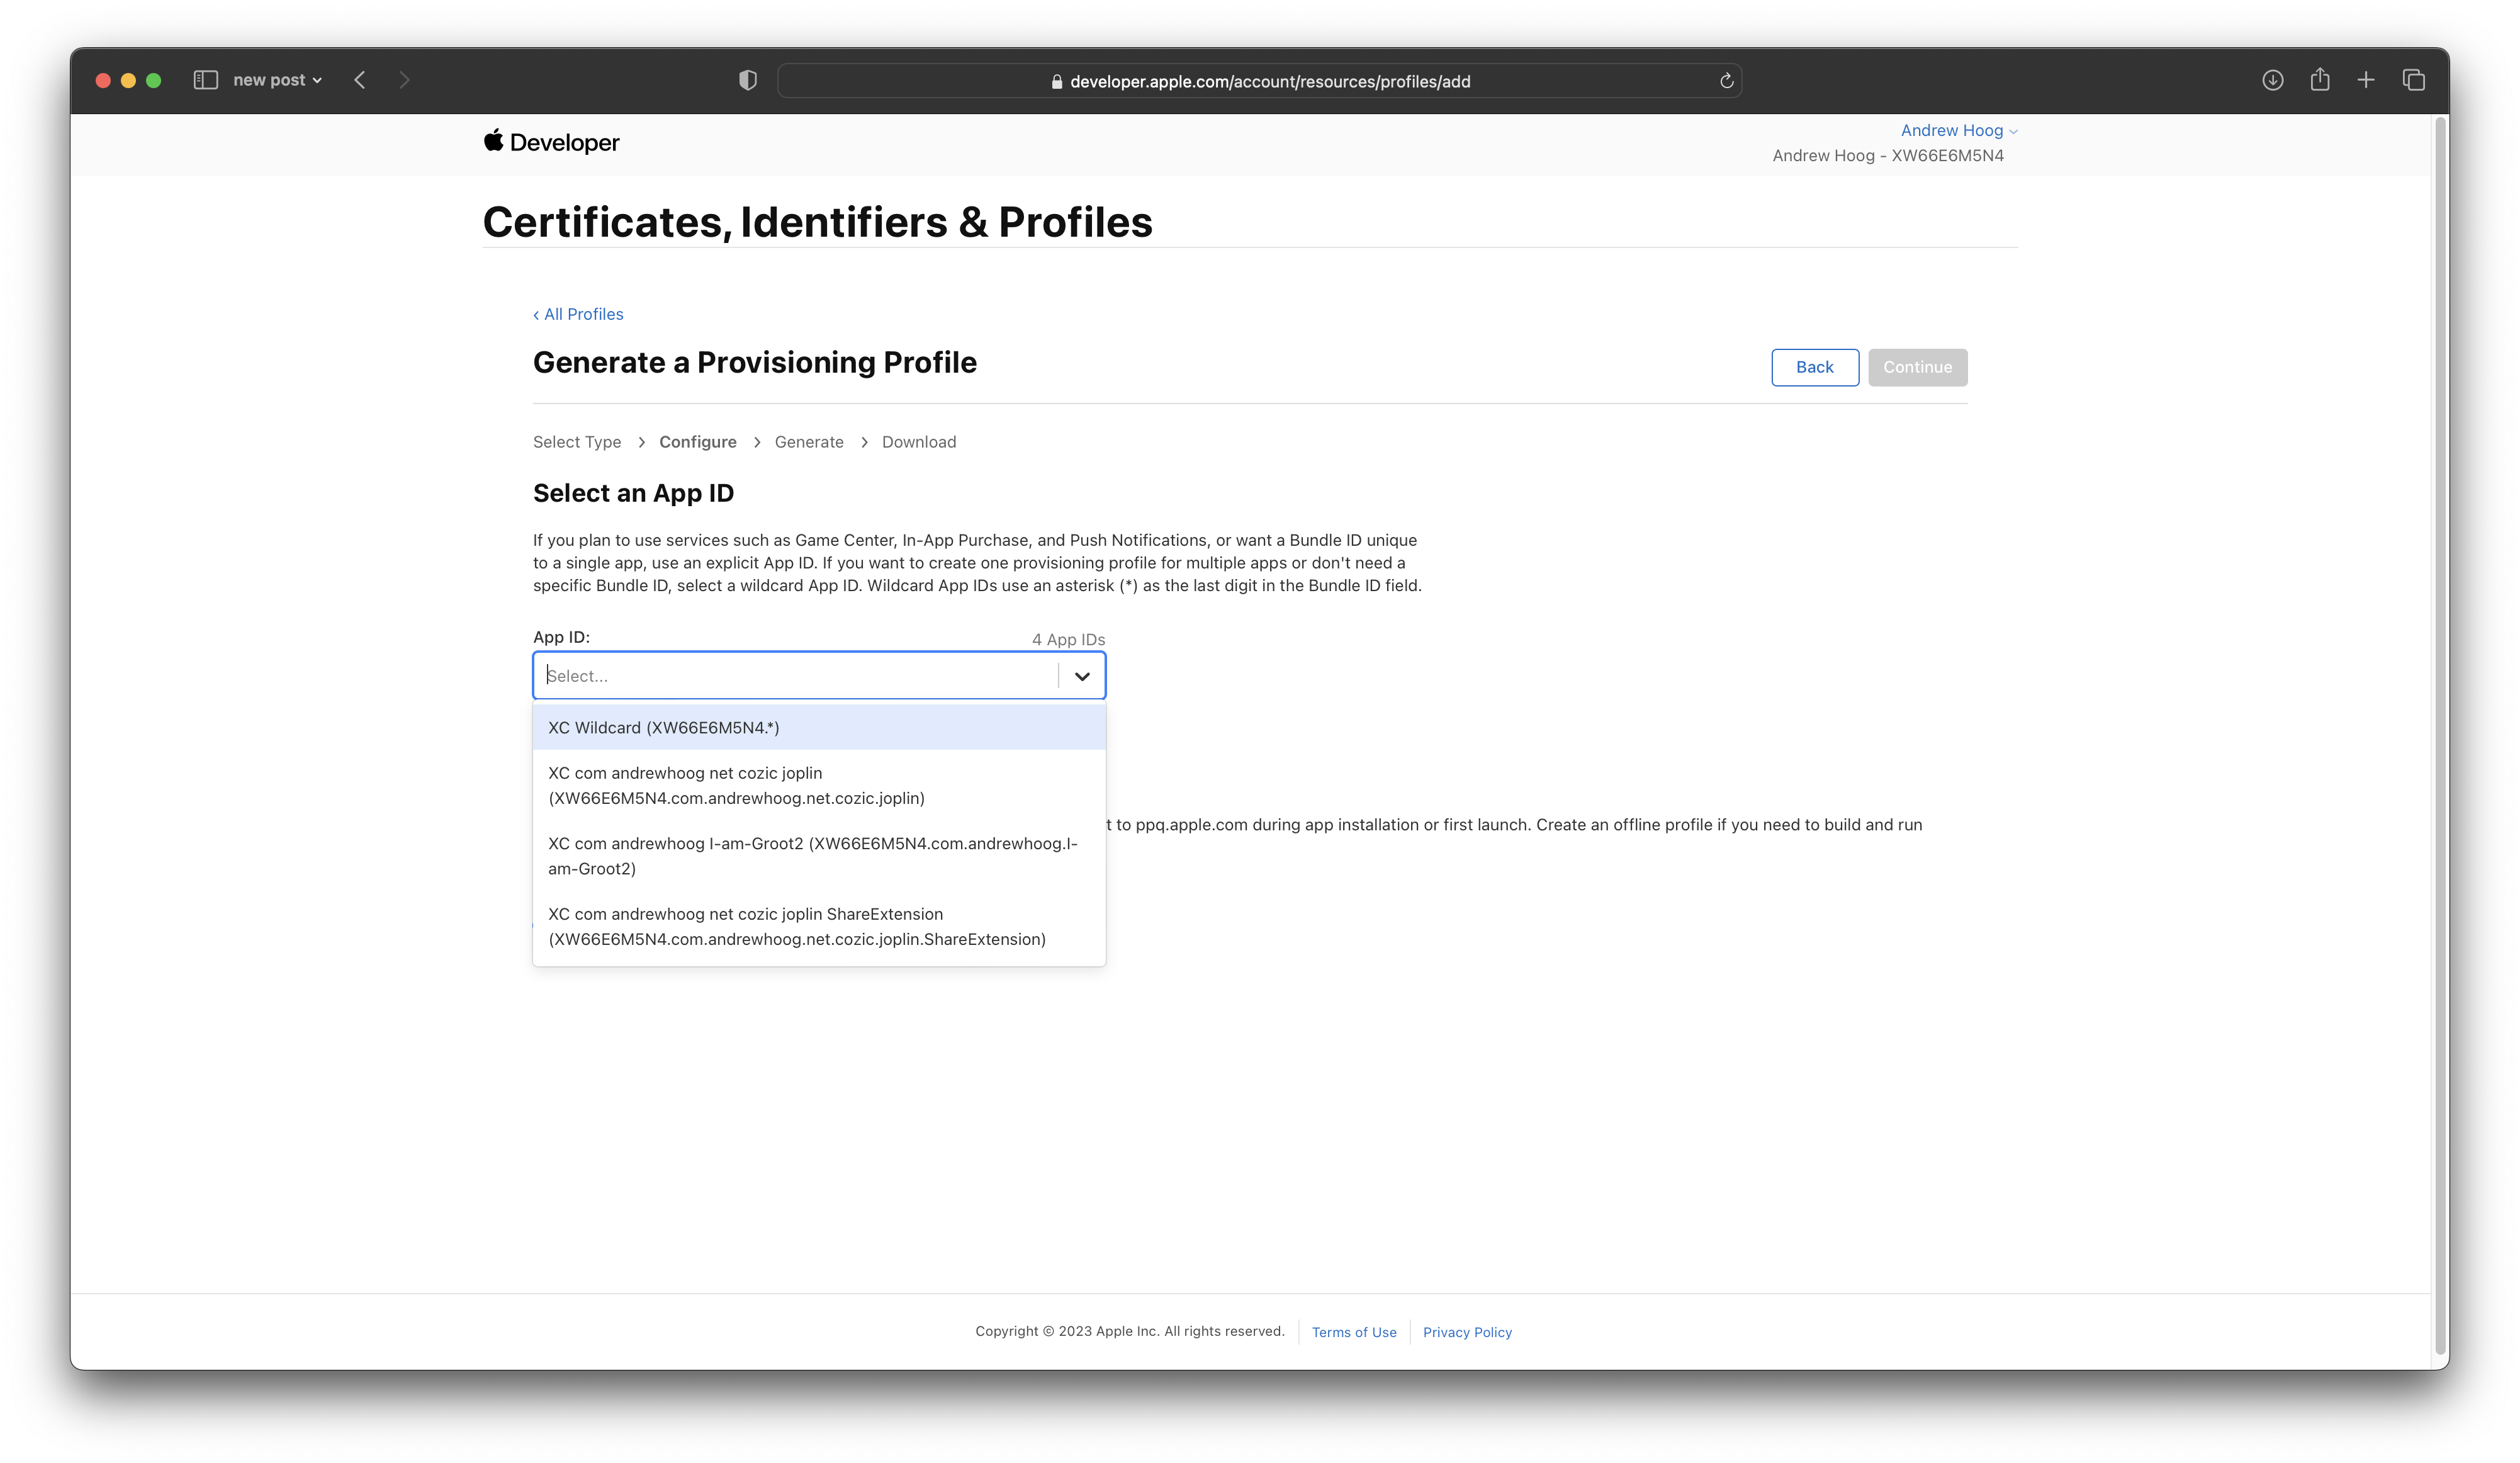
 Select your App ID:
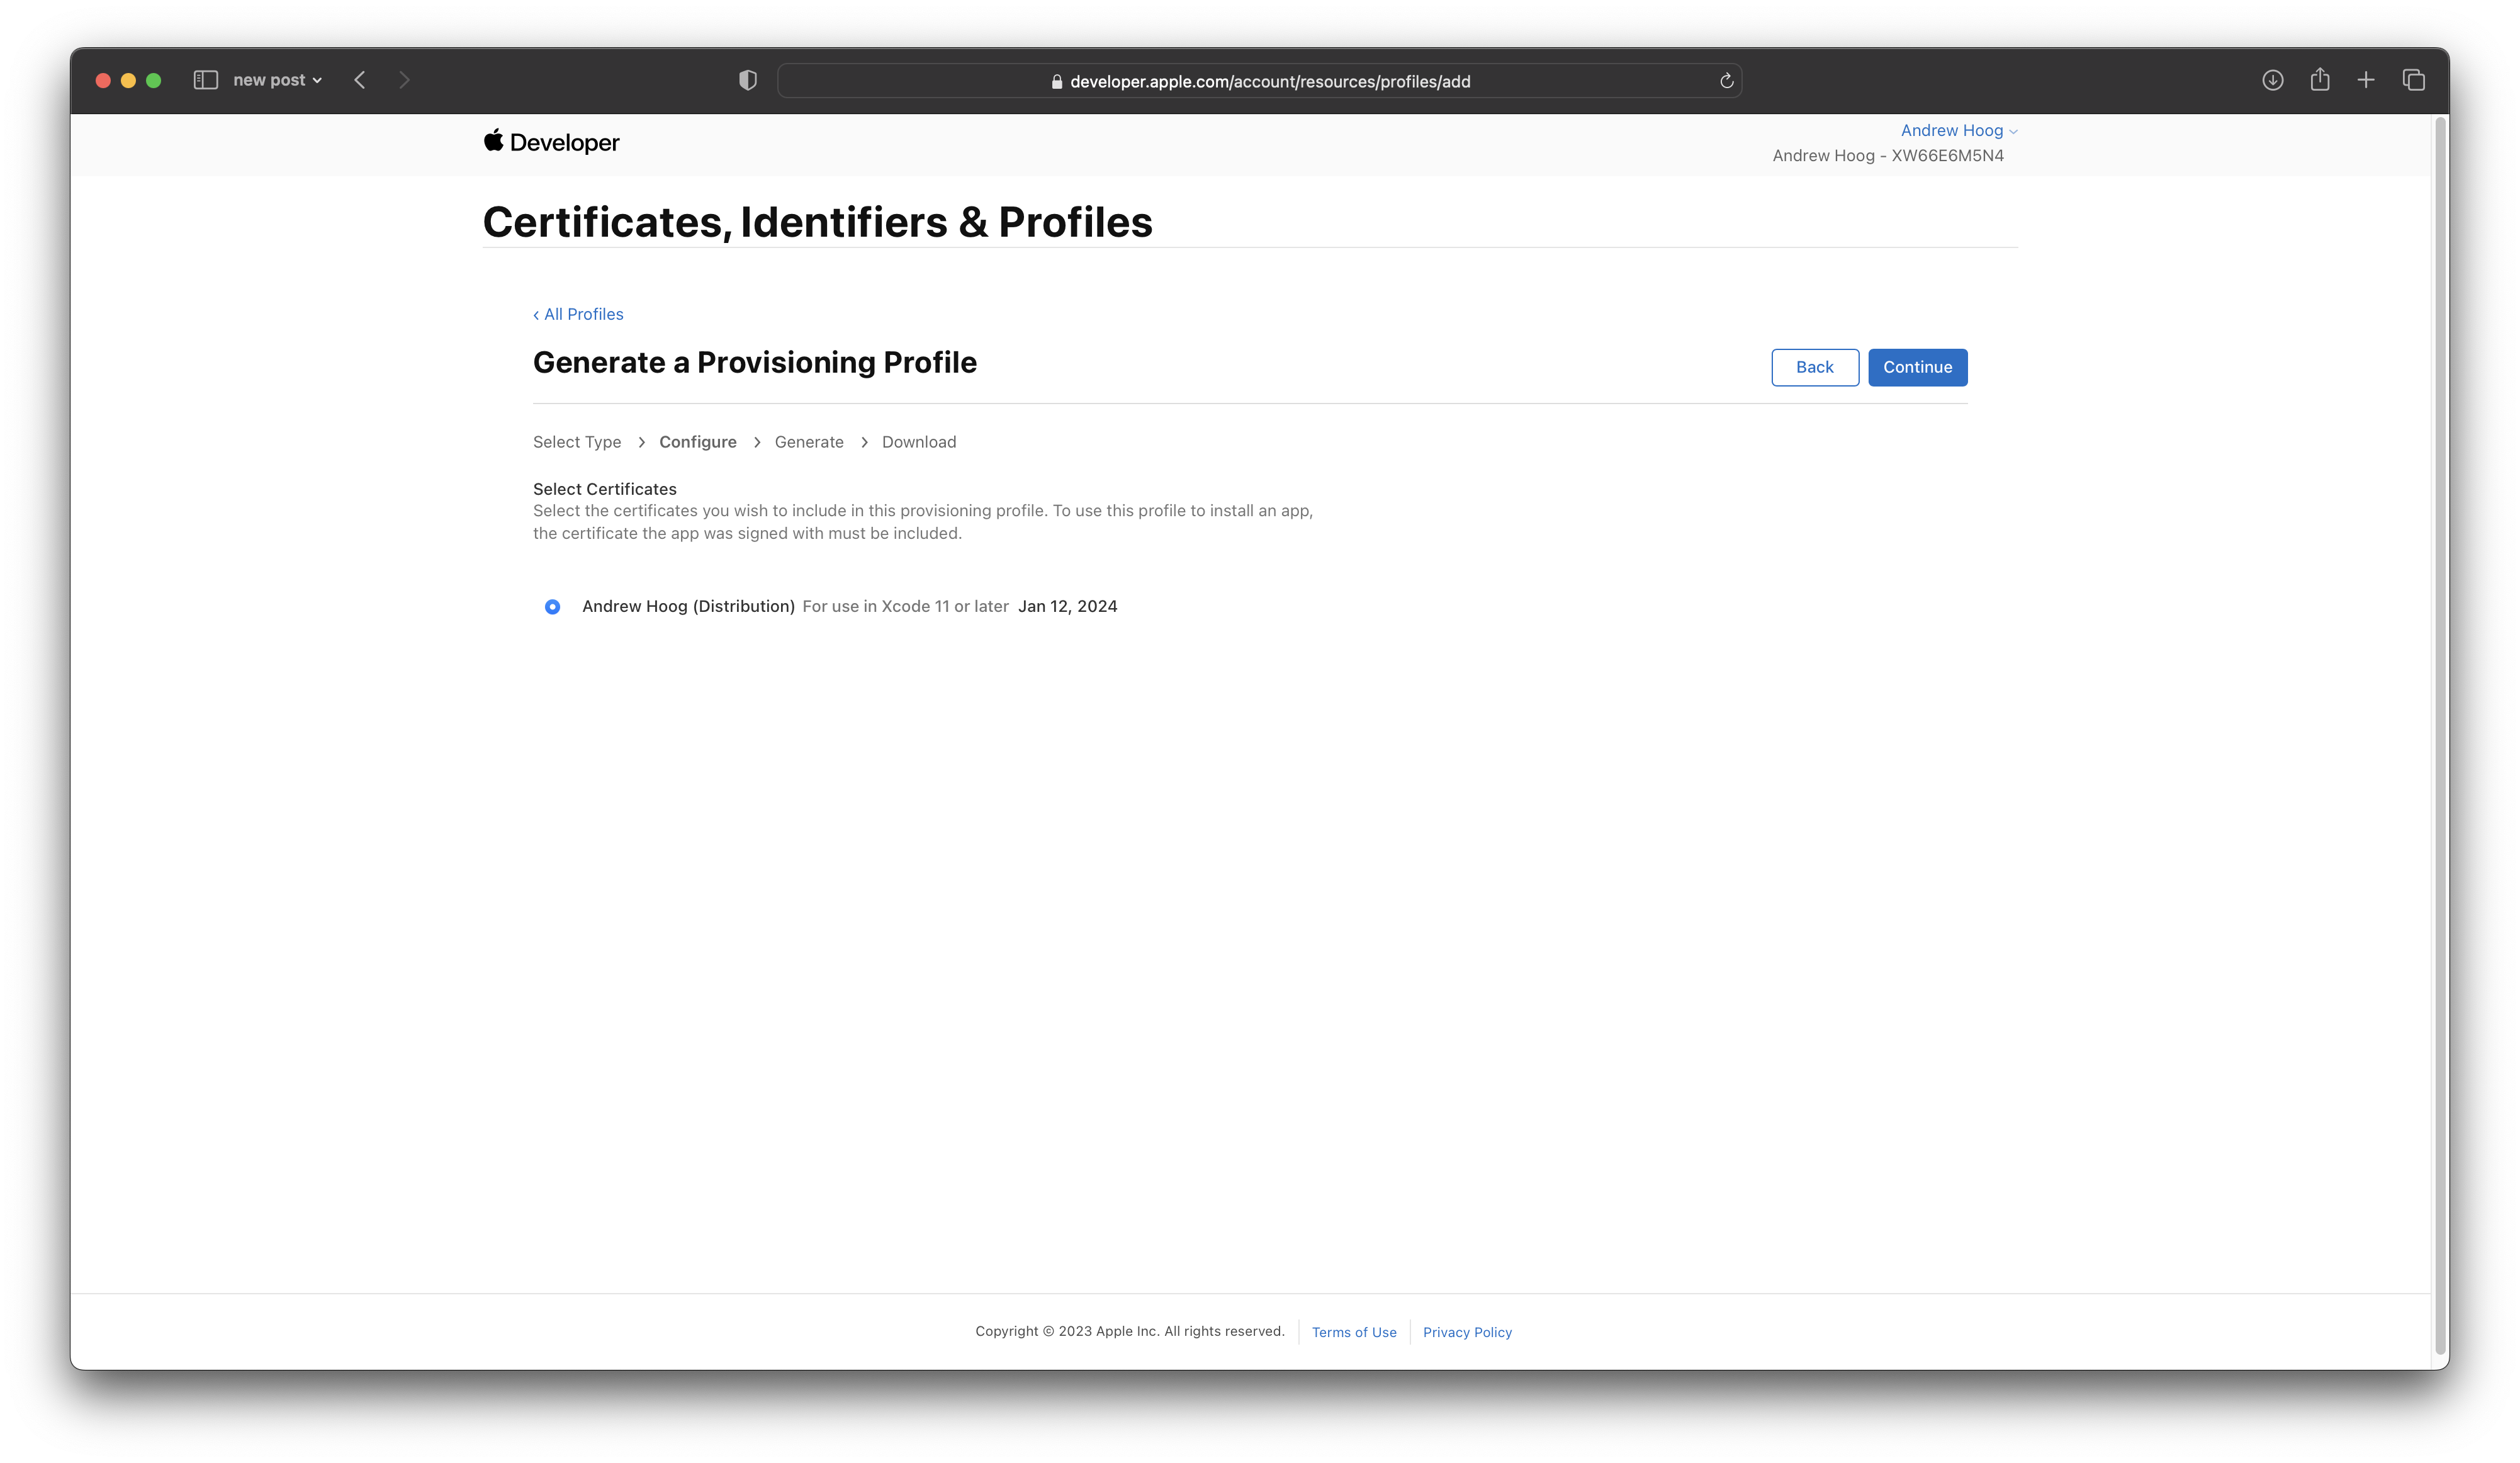
 Then select your Distribution certificate:
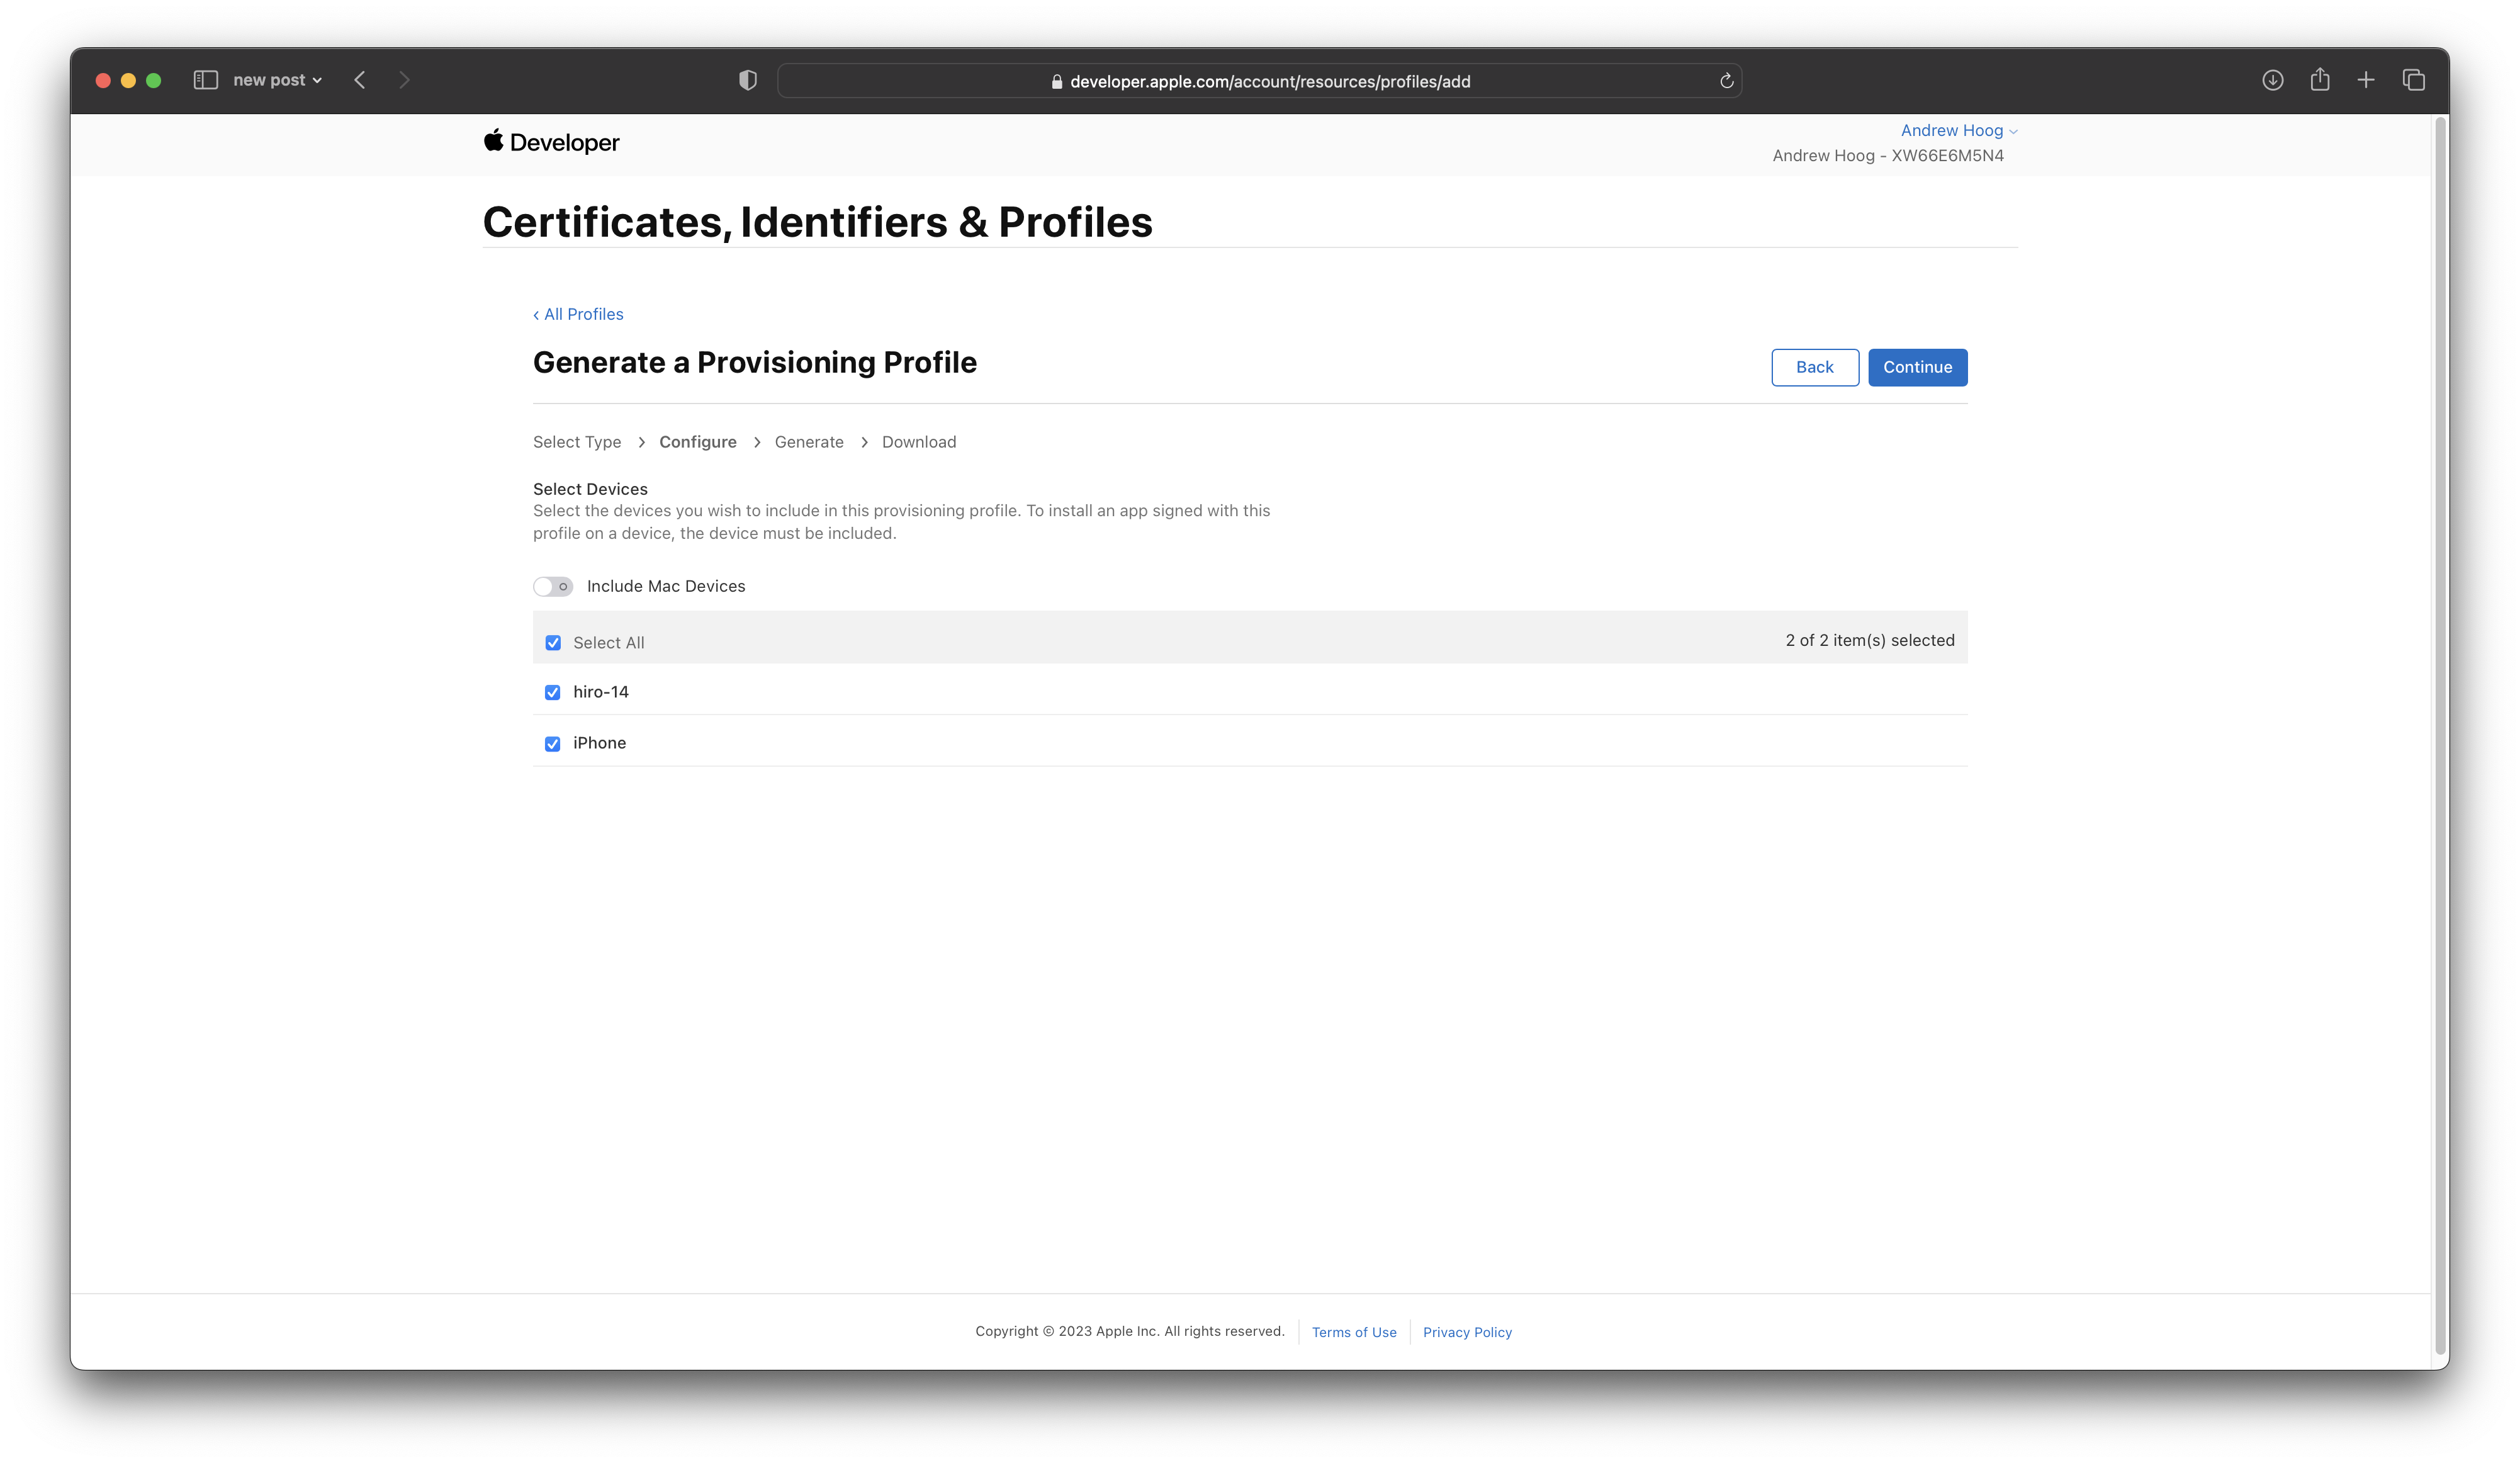
 Choose your devices:
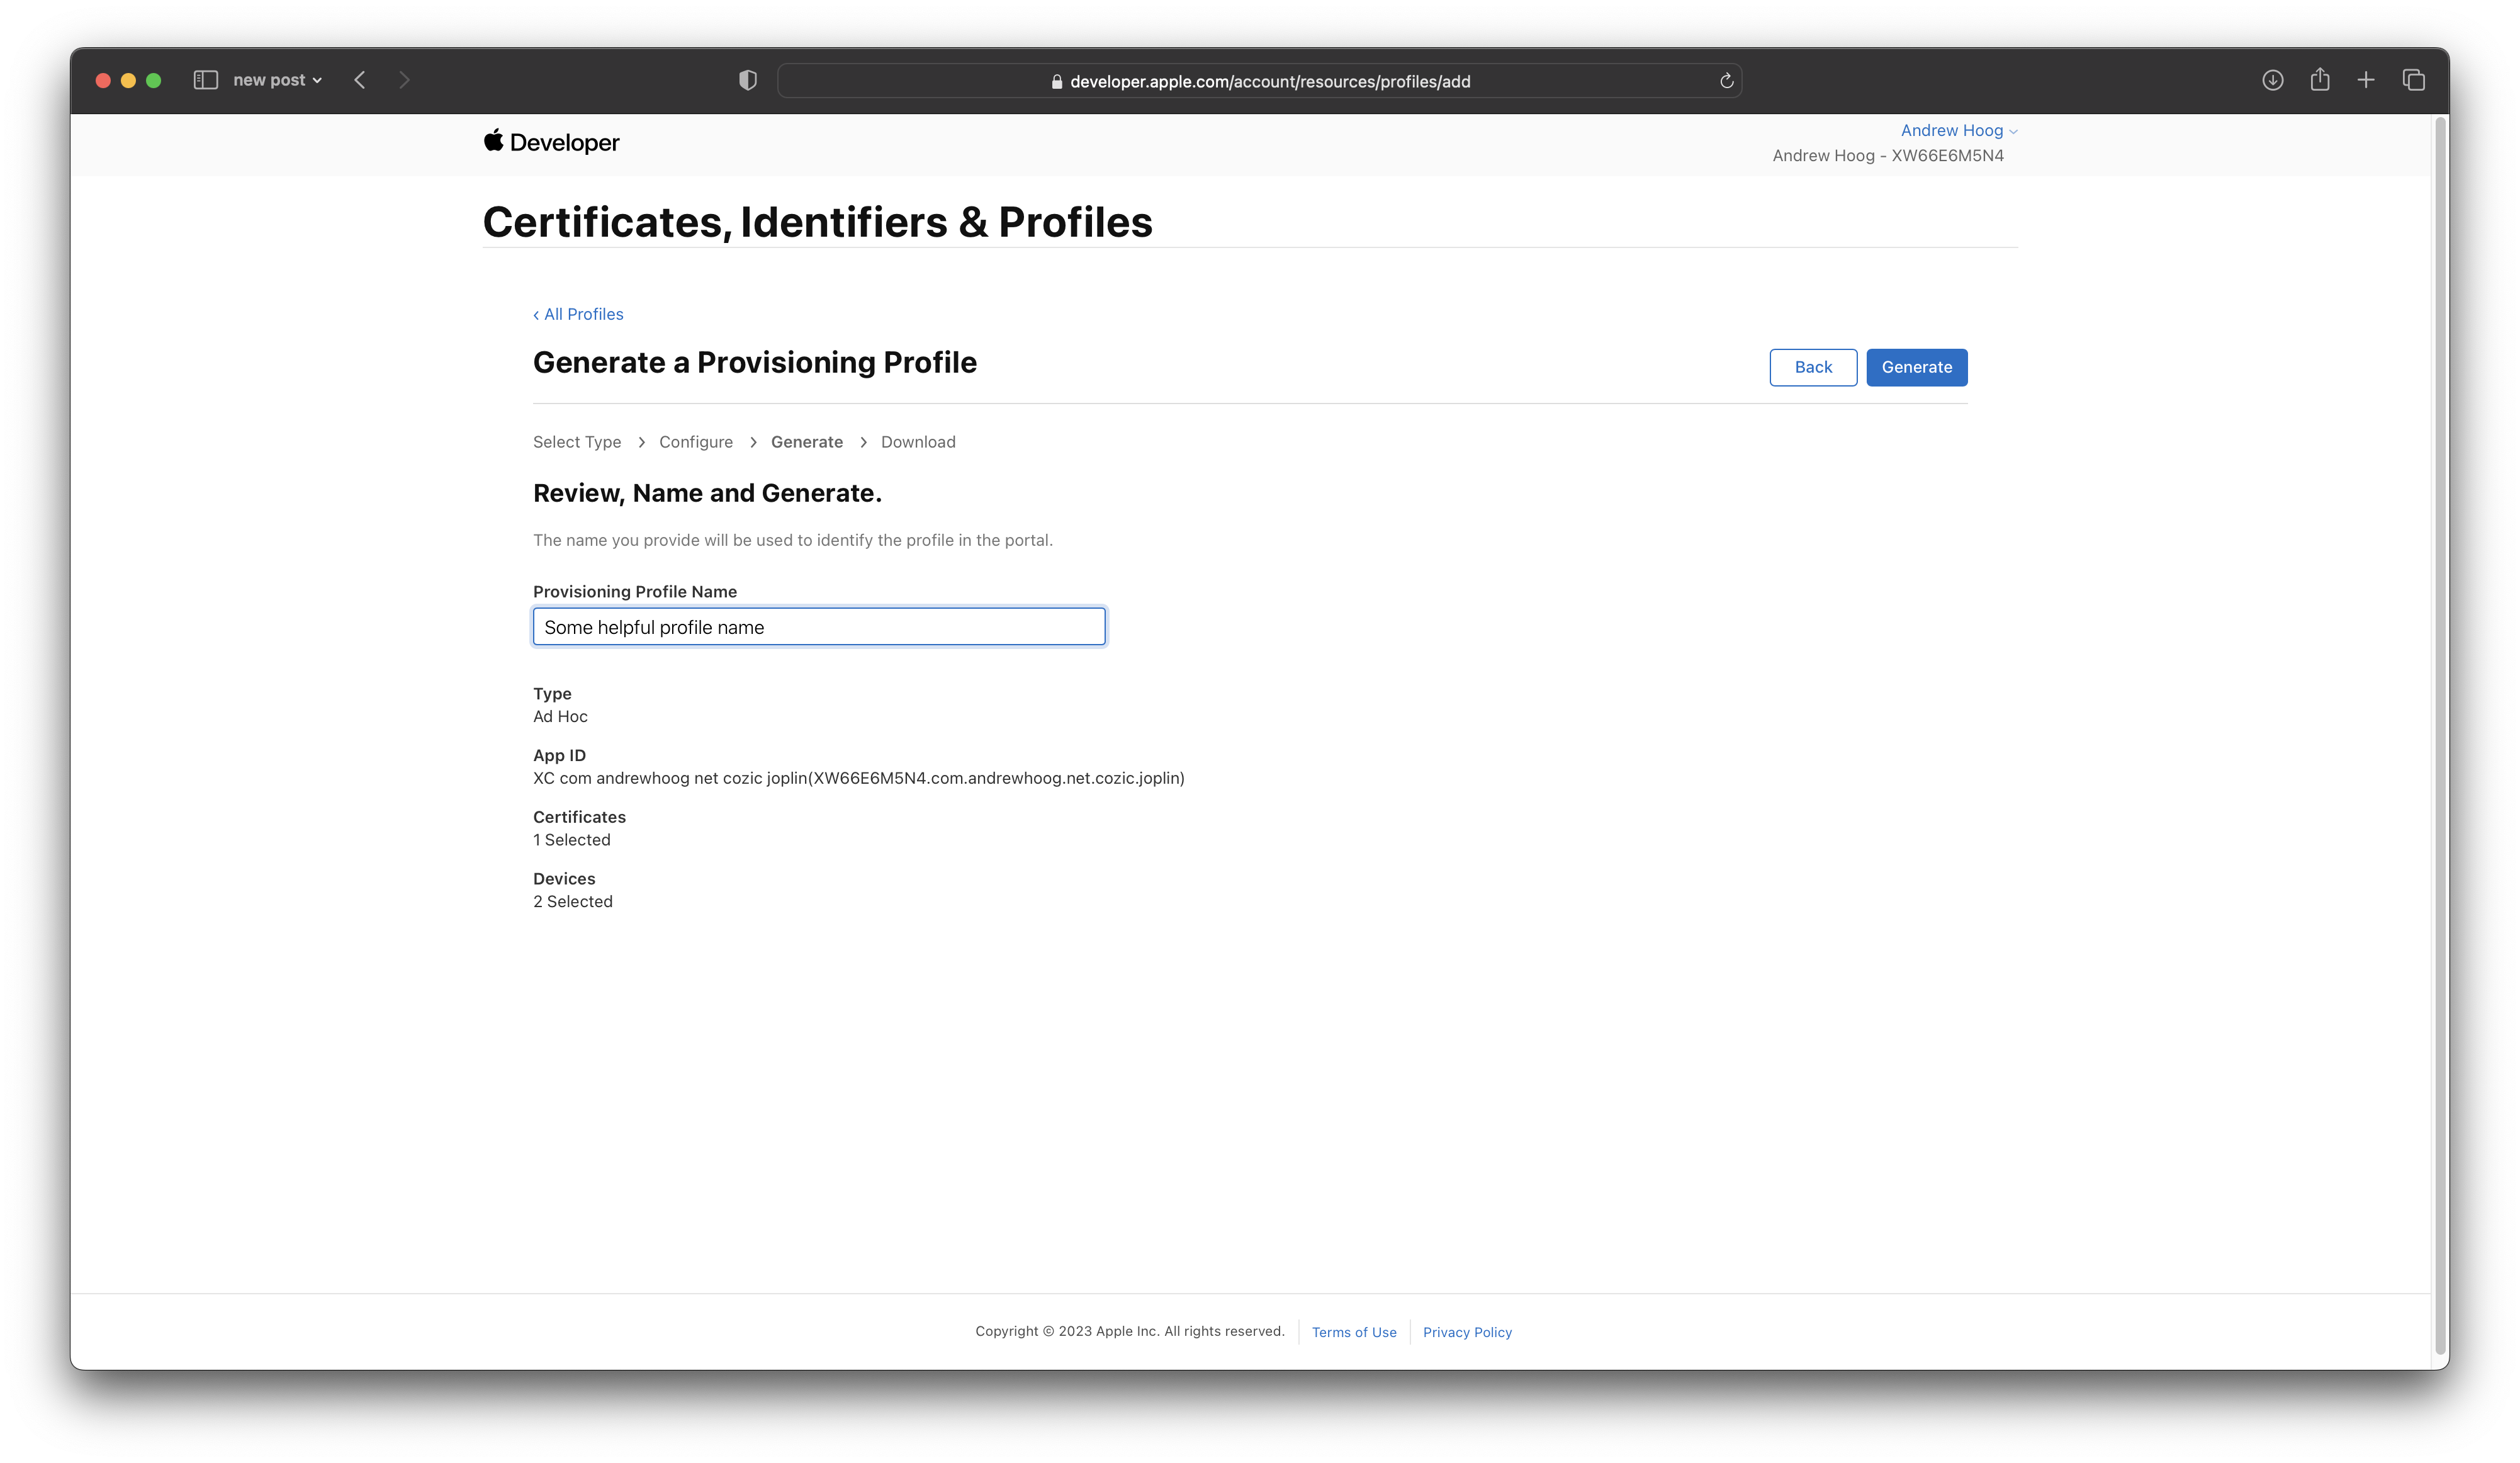
 And finally give your new provisioning profile a useful Name and finally click Generate:
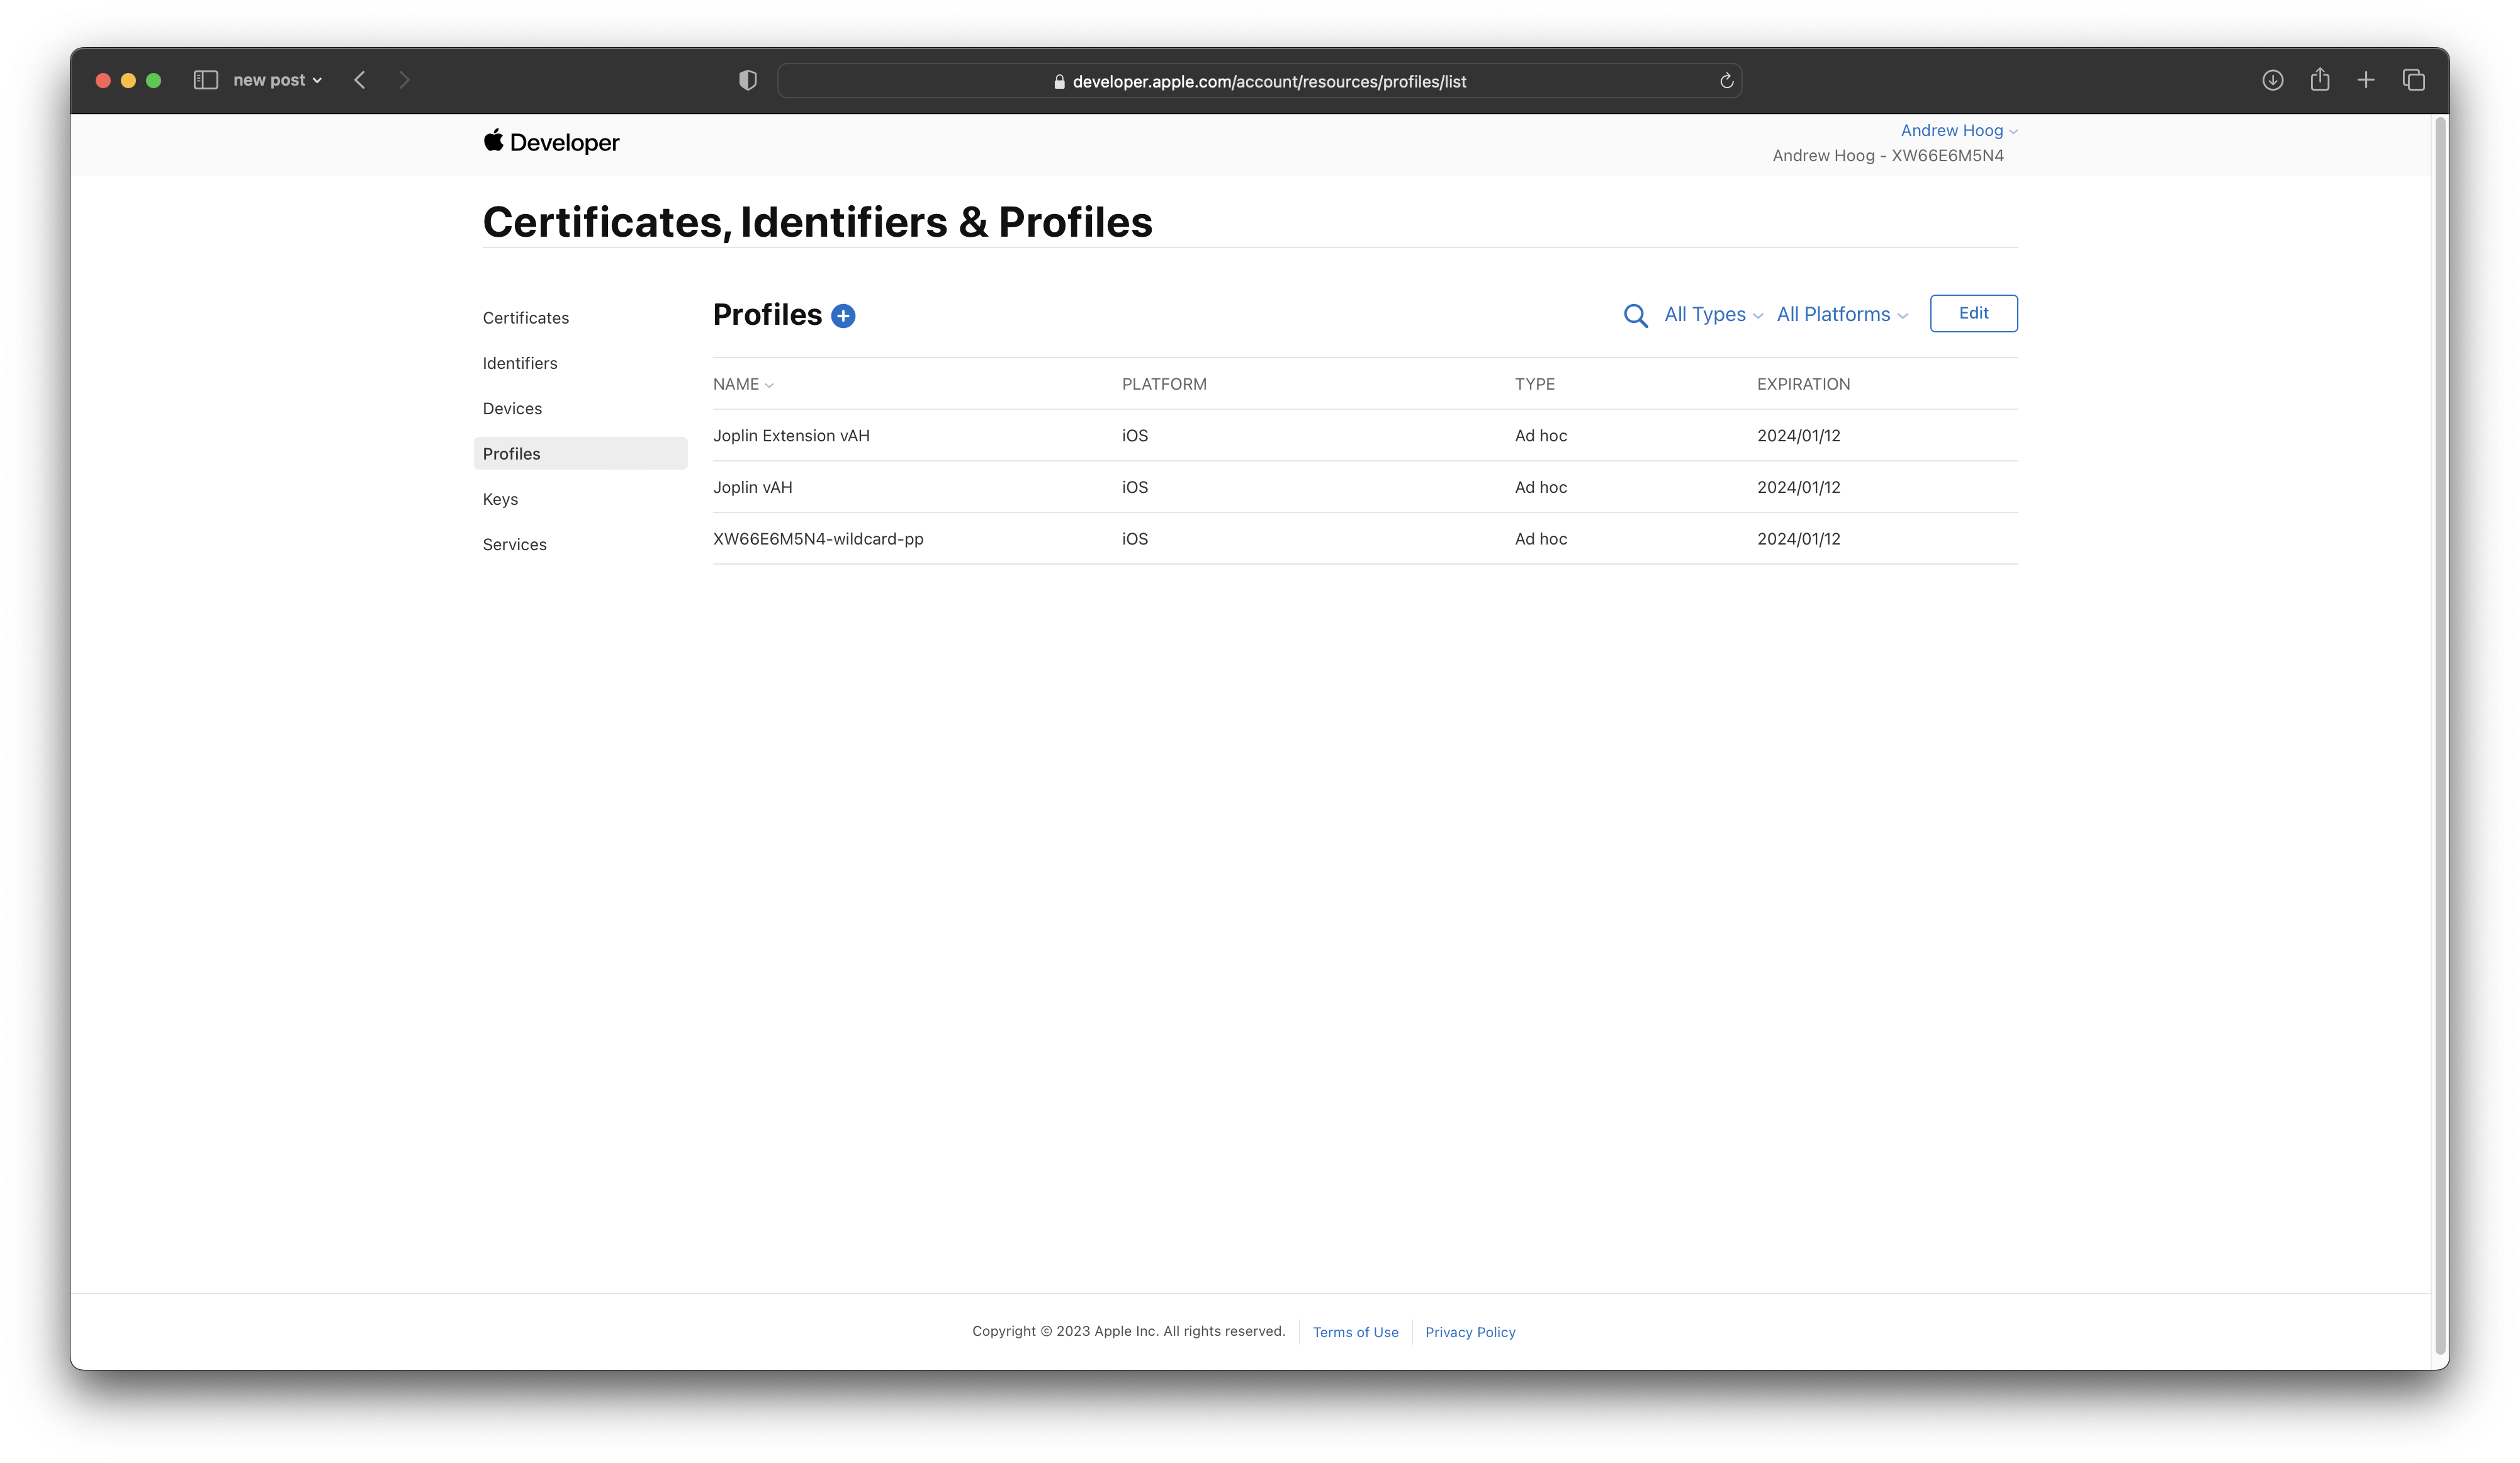
 You can then download the newly created provisioning profile to your computer and move it to
 ~/spfexpert/ios-rn-deploy. You need to follow these same steps for the ShareExtension. In the end, you can see the 2 provisioning profiles I created:
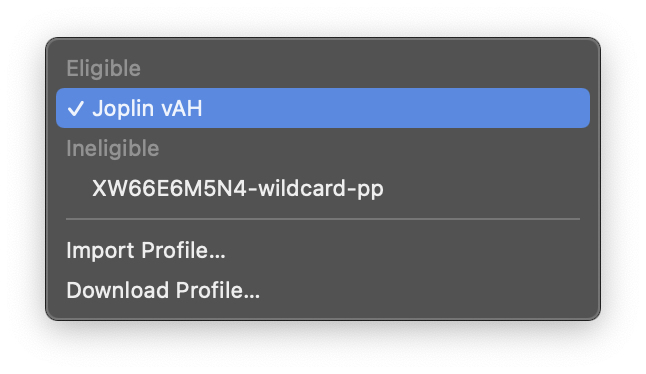
 In order to validate the provisioning profiles and certificates, I turn off
 Automatically manage signing in Xcode by selecting Joplin in the Project Navigator -> Joplin in Targets -> Signing & Capabilities and then uncheck Automatically manage signing
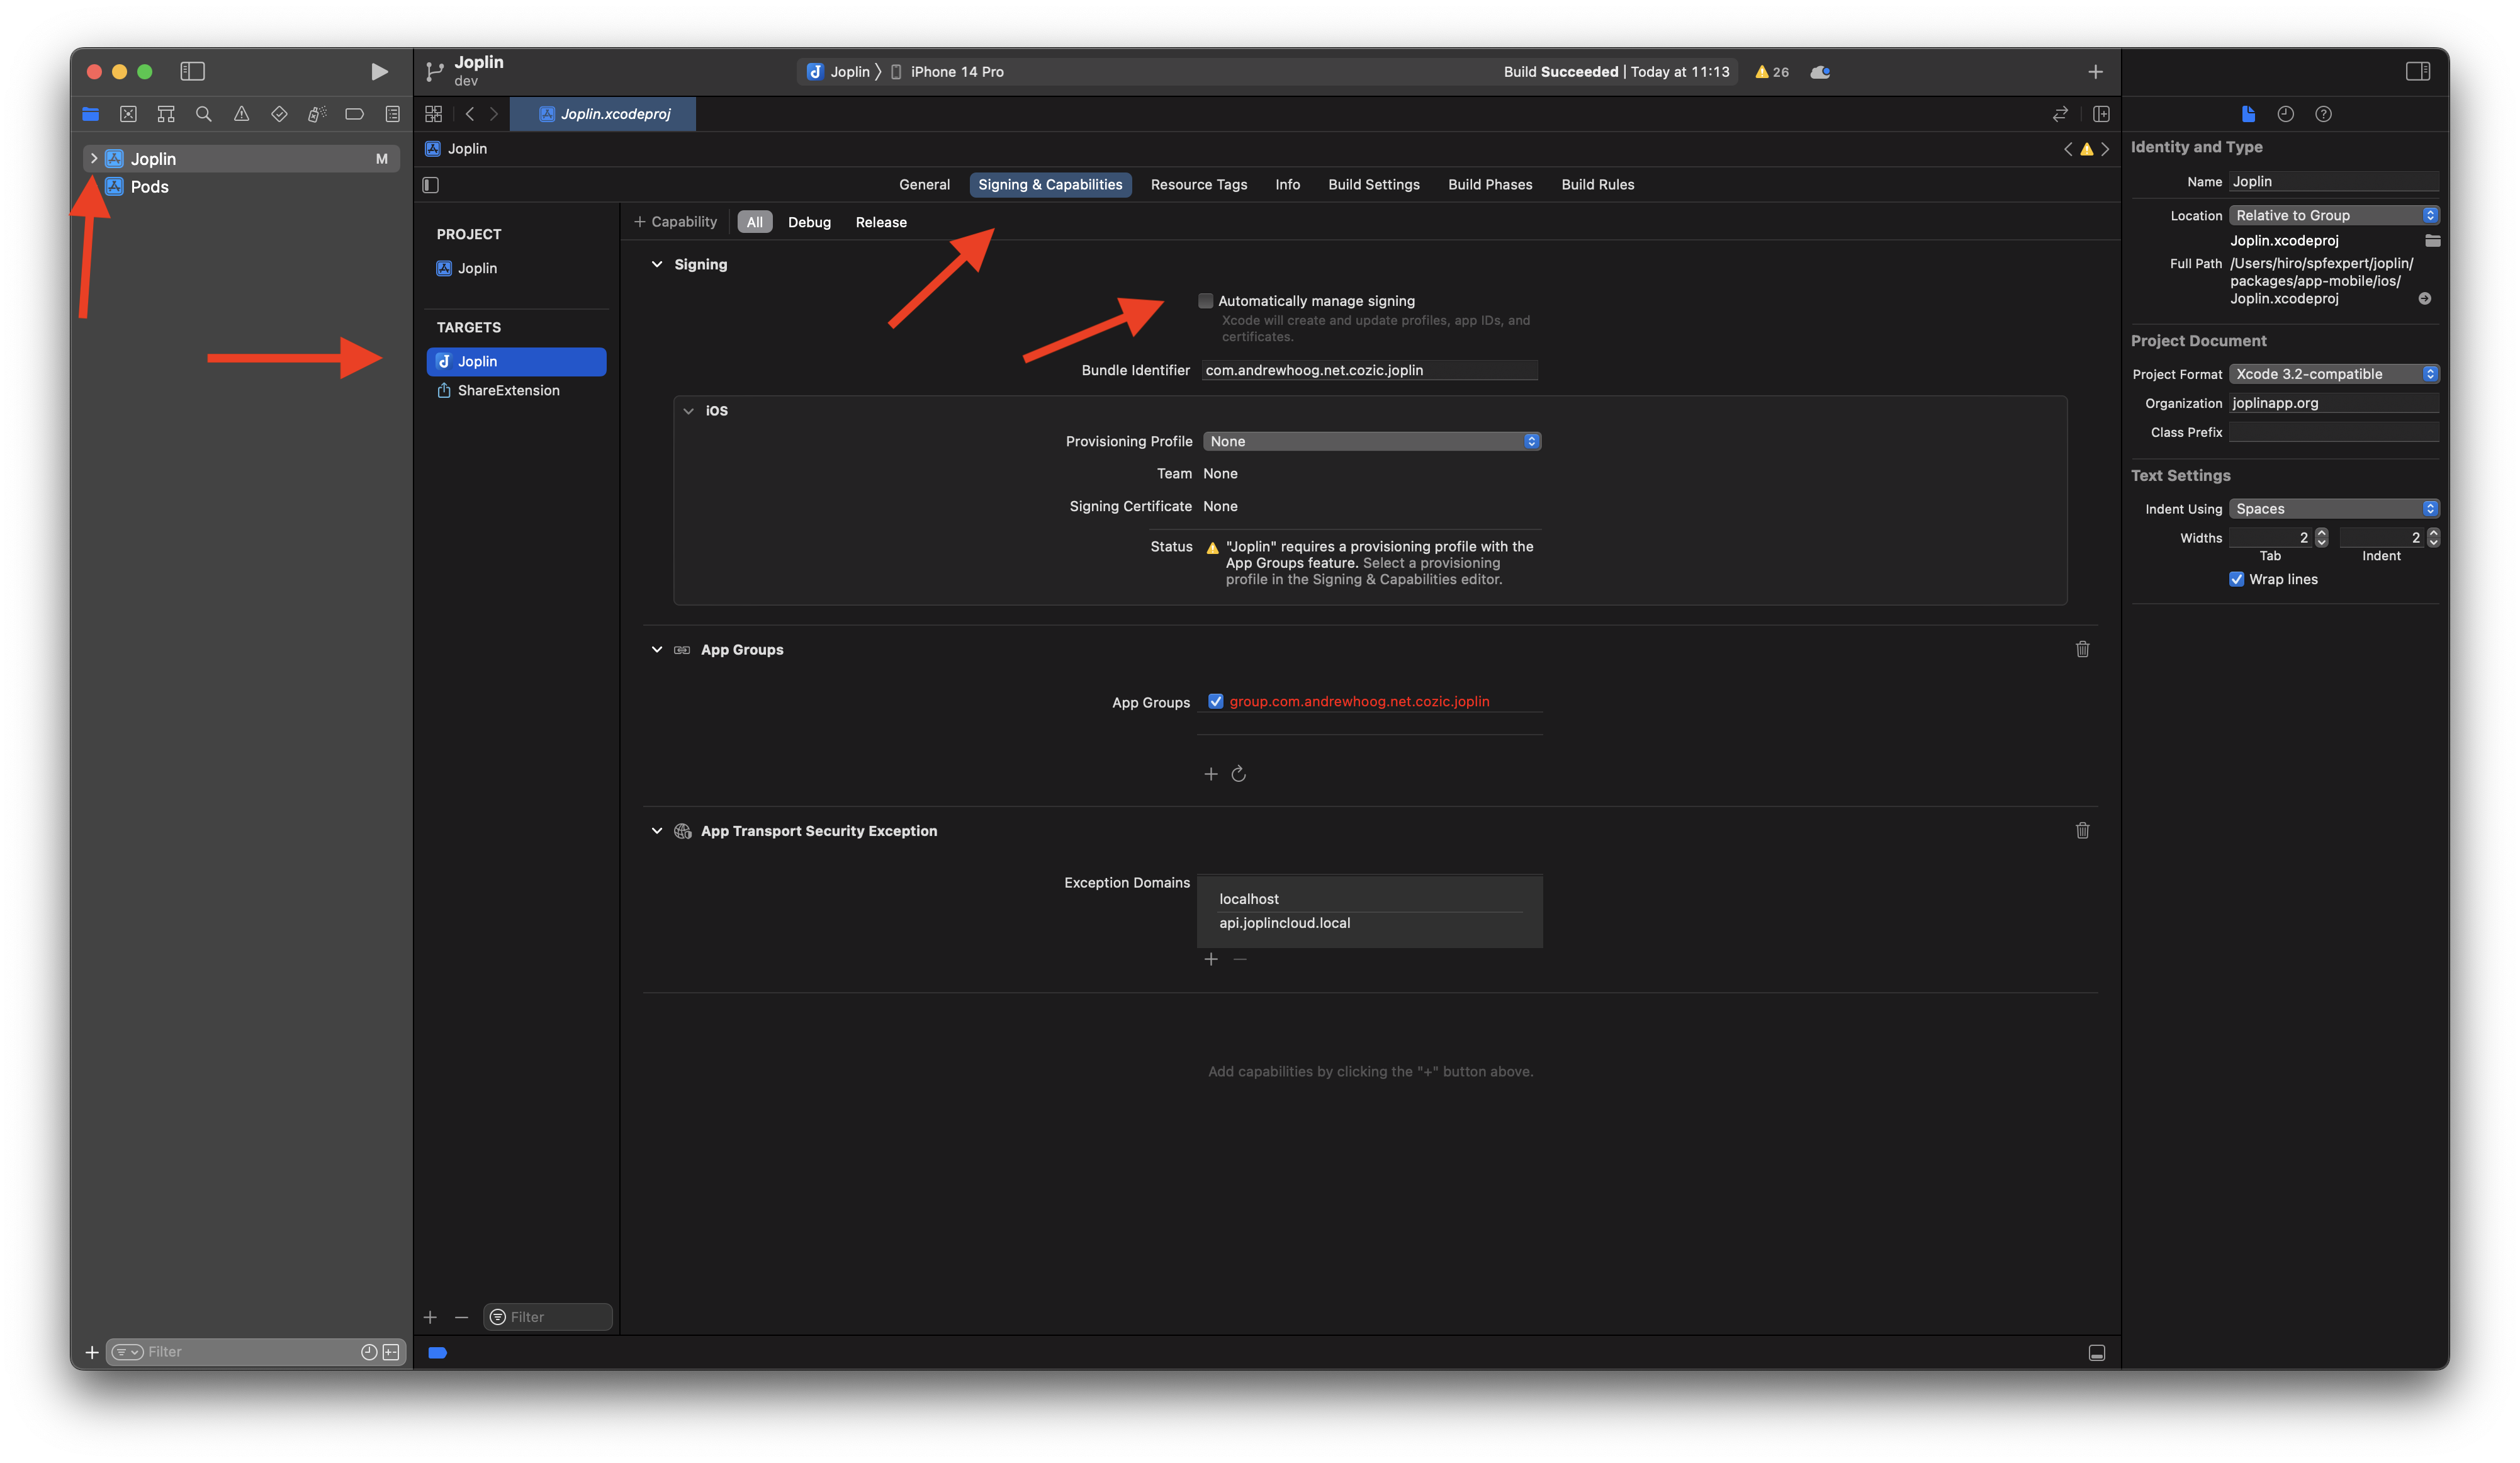 and then from the Provisioning Profile dropdown, select
 Import Profile... and chose the appropriate profile you just created and downloaded. Repeat this for the ShareExtension target as well.
 This is a great way to validate your App IDs, signing certificates and provisioning profiles. I take that further and 1) build the app (⌘B) and then 2) export an Ad Hoc ipa with Organizer (Xcode -> Window -> Organizer). This will validate the entire config including the certificates and provisioning profiles as well as create the ExportOptions.plist you need in the next section.
3. Repository secrets setup
The 5 repository secrets you need to setup:
- BUILD_CERTIFICATE_BASE64
- P12_PASSWORD
- PROVISION_PROFILES_BASE64
- KEYCHAIN_PASSWORD
- EXPORT_OPTIONS_PLIS
These are nearly identical to the previous post except I changed BUILD_PROVISION_PROFILE_BASE64 to PROVISION_PROFILES_BASE64 since we’ll need multiple provisioning profiles as discussed above. In order to deal with multiple provisioning profiles, I took a few additional steps which will work well for any iOS with more than one profile.
3.1 Bundling multiple mobile provisioning profiles
At this point, you should have the development and distribution profiles you need to build the app in a single directory.
For the Joplin app, you’ll actually need 4 mobile provisioning profiles so it becomes cumbersome to add each of them manually to the GitHub Actions. I ran across Christos Karaiskos “Archive and export iOS app with GitHub Actions” post on Medium where he creates a compressed tarball of all mobile provisioning profiles and then extracts them in the runner setup. I modified his approach slightly as I didn’t like the idea of storing build artifact in the code directly. Instead, I store the tarball as a base64 encoded repository secret. There is a 48kb limit on respository secrets (otherwise you have to move to a more cumbersome technique to store large secrets), but the provisioning profiles are small text files and you can compress them easily. In this case, the resulting .tgz is only 14K.
Assuming all mobile provisioning profiles are stored in a single directory on your workstation, you can easily create the tarball with:
$ tar czvf mobile-pp.tgz *.mobileprovision
3.2 Store the values as GitHub Repository Secrets
You now have all the configuration input you need and can follow the pattern from my previous post to create the 5 repository secrets listed above. The two passwords can simply be copied in as repository secrets but the remaining three should be base64 encoded before they are stored in their corresponding secret, e.g.:
$ base64 -i mobile-pp.tgz | pbcopy
4. GitHub Action workflow
The majority of the differences between building a native iOS app vs a React Native iOS app are related to setting up the proper environment.
Specifically, React Native needs:
- Ruby
- Bundler
- Cocoapods
- Node.JS
- Corepack
- Yarn
Amazingly, GitHub’s macOS-12 runner has all this software which greatly simplifies our setup!
Copy the following workflow into .github/workflows/build-rn-ios-app-spfexpert.yml:
name: "Build React Native iOS app"

on:
  # manual trigger but change to any supported event
  # see addl: https://www.andrewhoog.com/post/how-to-build-react-native-android-app-with-github-actions/#3-run-build-workflow
  workflow_dispatch:
    branches: [main]

jobs:
  build_with_signing:
    runs-on: macos-12
    steps:
      - name: checkout repository
        uses: actions/checkout@v3

      - name: Install the Apple certificate and provisioning profile
        env:
          BUILD_CERTIFICATE_BASE64: ${{ secrets.BUILD_CERTIFICATE_BASE64 }}
          P12_PASSWORD: ${{ secrets.P12_PASSWORD }}
          PROVISION_PROFILES_BASE64: ${{ secrets.PROVISION_PROFILES_BASE64 }}
          KEYCHAIN_PASSWORD: ${{ secrets.KEYCHAIN_PASSWORD }}
        run: |
          # create variables
          CERTIFICATE_PATH=$RUNNER_TEMP/build_certificate.p12
          PP_ARCHIVE=$RUNNER_TEMP/mobile_pp.tgz
          KEYCHAIN_PATH=$RUNNER_TEMP/app-signing.keychain-db

          # import certificate and provisioning profile from secrets
          echo -n "$BUILD_CERTIFICATE_BASE64" | base64 --decode -o $CERTIFICATE_PATH
          echo -n "$PROVISION_PROFILES_BASE64" | base64 --decode -o $PP_ARCHIVE

          # create temporary keychain
          security create-keychain -p "$KEYCHAIN_PASSWORD" $KEYCHAIN_PATH
          security set-keychain-settings -lut 21600 $KEYCHAIN_PATH
          security unlock-keychain -p "$KEYCHAIN_PASSWORD" $KEYCHAIN_PATH

          # import certificate to keychain
          security import $CERTIFICATE_PATH -P "$P12_PASSWORD" -A -t cert -f pkcs12 -k $KEYCHAIN_PATH
          security list-keychain -d user -s $KEYCHAIN_PATH

          # extract and copy provisioning profile(s)
          mkdir -p ~/Library/MobileDevice/Provisioning\ Profiles
          tar xzvf $PP_ARCHIVE -C $RUNNER_TEMP
          for PROVISION in `ls $RUNNER_TEMP/*.mobileprovision`
          do
            UUID=`/usr/libexec/PlistBuddy -c 'Print :UUID' /dev/stdin <<< $(security cms -D -i $PROVISION)`
            cp $PROVISION ~/Library/MobileDevice/Provisioning\ Profiles/$UUID.mobileprovision
          done

          # echo some output
          security find-identity -v -p codesigning
          ls -l ~/Library/MobileDevice/Provisioning\ Profiles

      - uses: actions/setup-node@v3
        with:
          node-version: "18"
          cache: "yarn"

      - name: Enable Corepack
        run: corepack enable

      - name: install yarn dependencies
        run: |
          cd packages/app-mobile/ios
          yarn install

      - name: install Cocoapod dependencies
        run: |
          cd packages/app-mobile/ios
          pod install

      - name: build archive
        run: |
          cd packages/app-mobile/ios
          xcodebuild -workspace Joplin.xcworkspace \
          -scheme "Joplin" \
          -sdk iphoneos \
          -configuration Debug \
          -destination generic/platform=iOS \
          -archivePath $RUNNER_TEMP/joplin.xcarchive \
          archive

      - name: export ipa
        env:
          EXPORT_OPTIONS_PLIST: ${{ secrets.EXPORT_OPTIONS_PLIST }}
        run: |
          EXPORT_OPTS_PATH=$RUNNER_TEMP/ExportOptions.plist
          echo -n "$EXPORT_OPTIONS_PLIST" | base64 --decode -o $EXPORT_OPTS_PATH
          xcodebuild -exportArchive \
          -archivePath $RUNNER_TEMP/joplin.xcarchive \
          -exportOptionsPlist $EXPORT_OPTS_PATH \
          -exportPath $RUNNER_TEMP/build

      - name: Upload application
        uses: actions/upload-artifact@v3
        with:
          name: app
          path: ${{ runner.temp }}/build/Joplin.ipa
          # you can also archive the entire directory
          # path: ${{ runner.temp }}/build
          retention-days: 3
Since this is a demo, we’ll go ahead and delete the existing GitHub Actions that Laurent and Joplin team use to mange the oss app. And then we’ll commit these changes:
$ git rm .github/workflows/build-android.yml
$ git rm .github/workflows/cla.yml
$ git rm .github/workflows/close-stale-issues.yml
$ git rm .github/workflows/github-actions-main.yml
$ git commit -a -m 'remove existing action workflows'
$ git add .github/workflows/build-rn-ios-app-spfexpert.yml
$ git commit .github/workflows/build-rn-ios-app-spfexpert.yml -m 'build iOS app'
$ git push
Caching dependencies in GitHub Actions
The build job takes over 45 mins the first time around so caching dependencies is key to not only reduced wait time for a build but reducing overall GitHub Action minutes.
To cache yarn, there is built in support with actions/setup-node:
- uses: actions/setup-node@v3
  with:
    node-version: "18"
    cache: "yarn"
To cache CocoaPods, GitHub has built in support in their actions/cache which they’ve documented in the README:
- uses: actions/cache@v3
  with:
    path: Pods
    key: ${{ runner.os }}-pods-${{ hashFiles('**/Podfile.lock') }}
    restore-keys: |
      ${{ runner.os }}-pods-
Note: the CocoaPods cache caused the GitHub Action to fail with a timeout so I’ve removed for now.
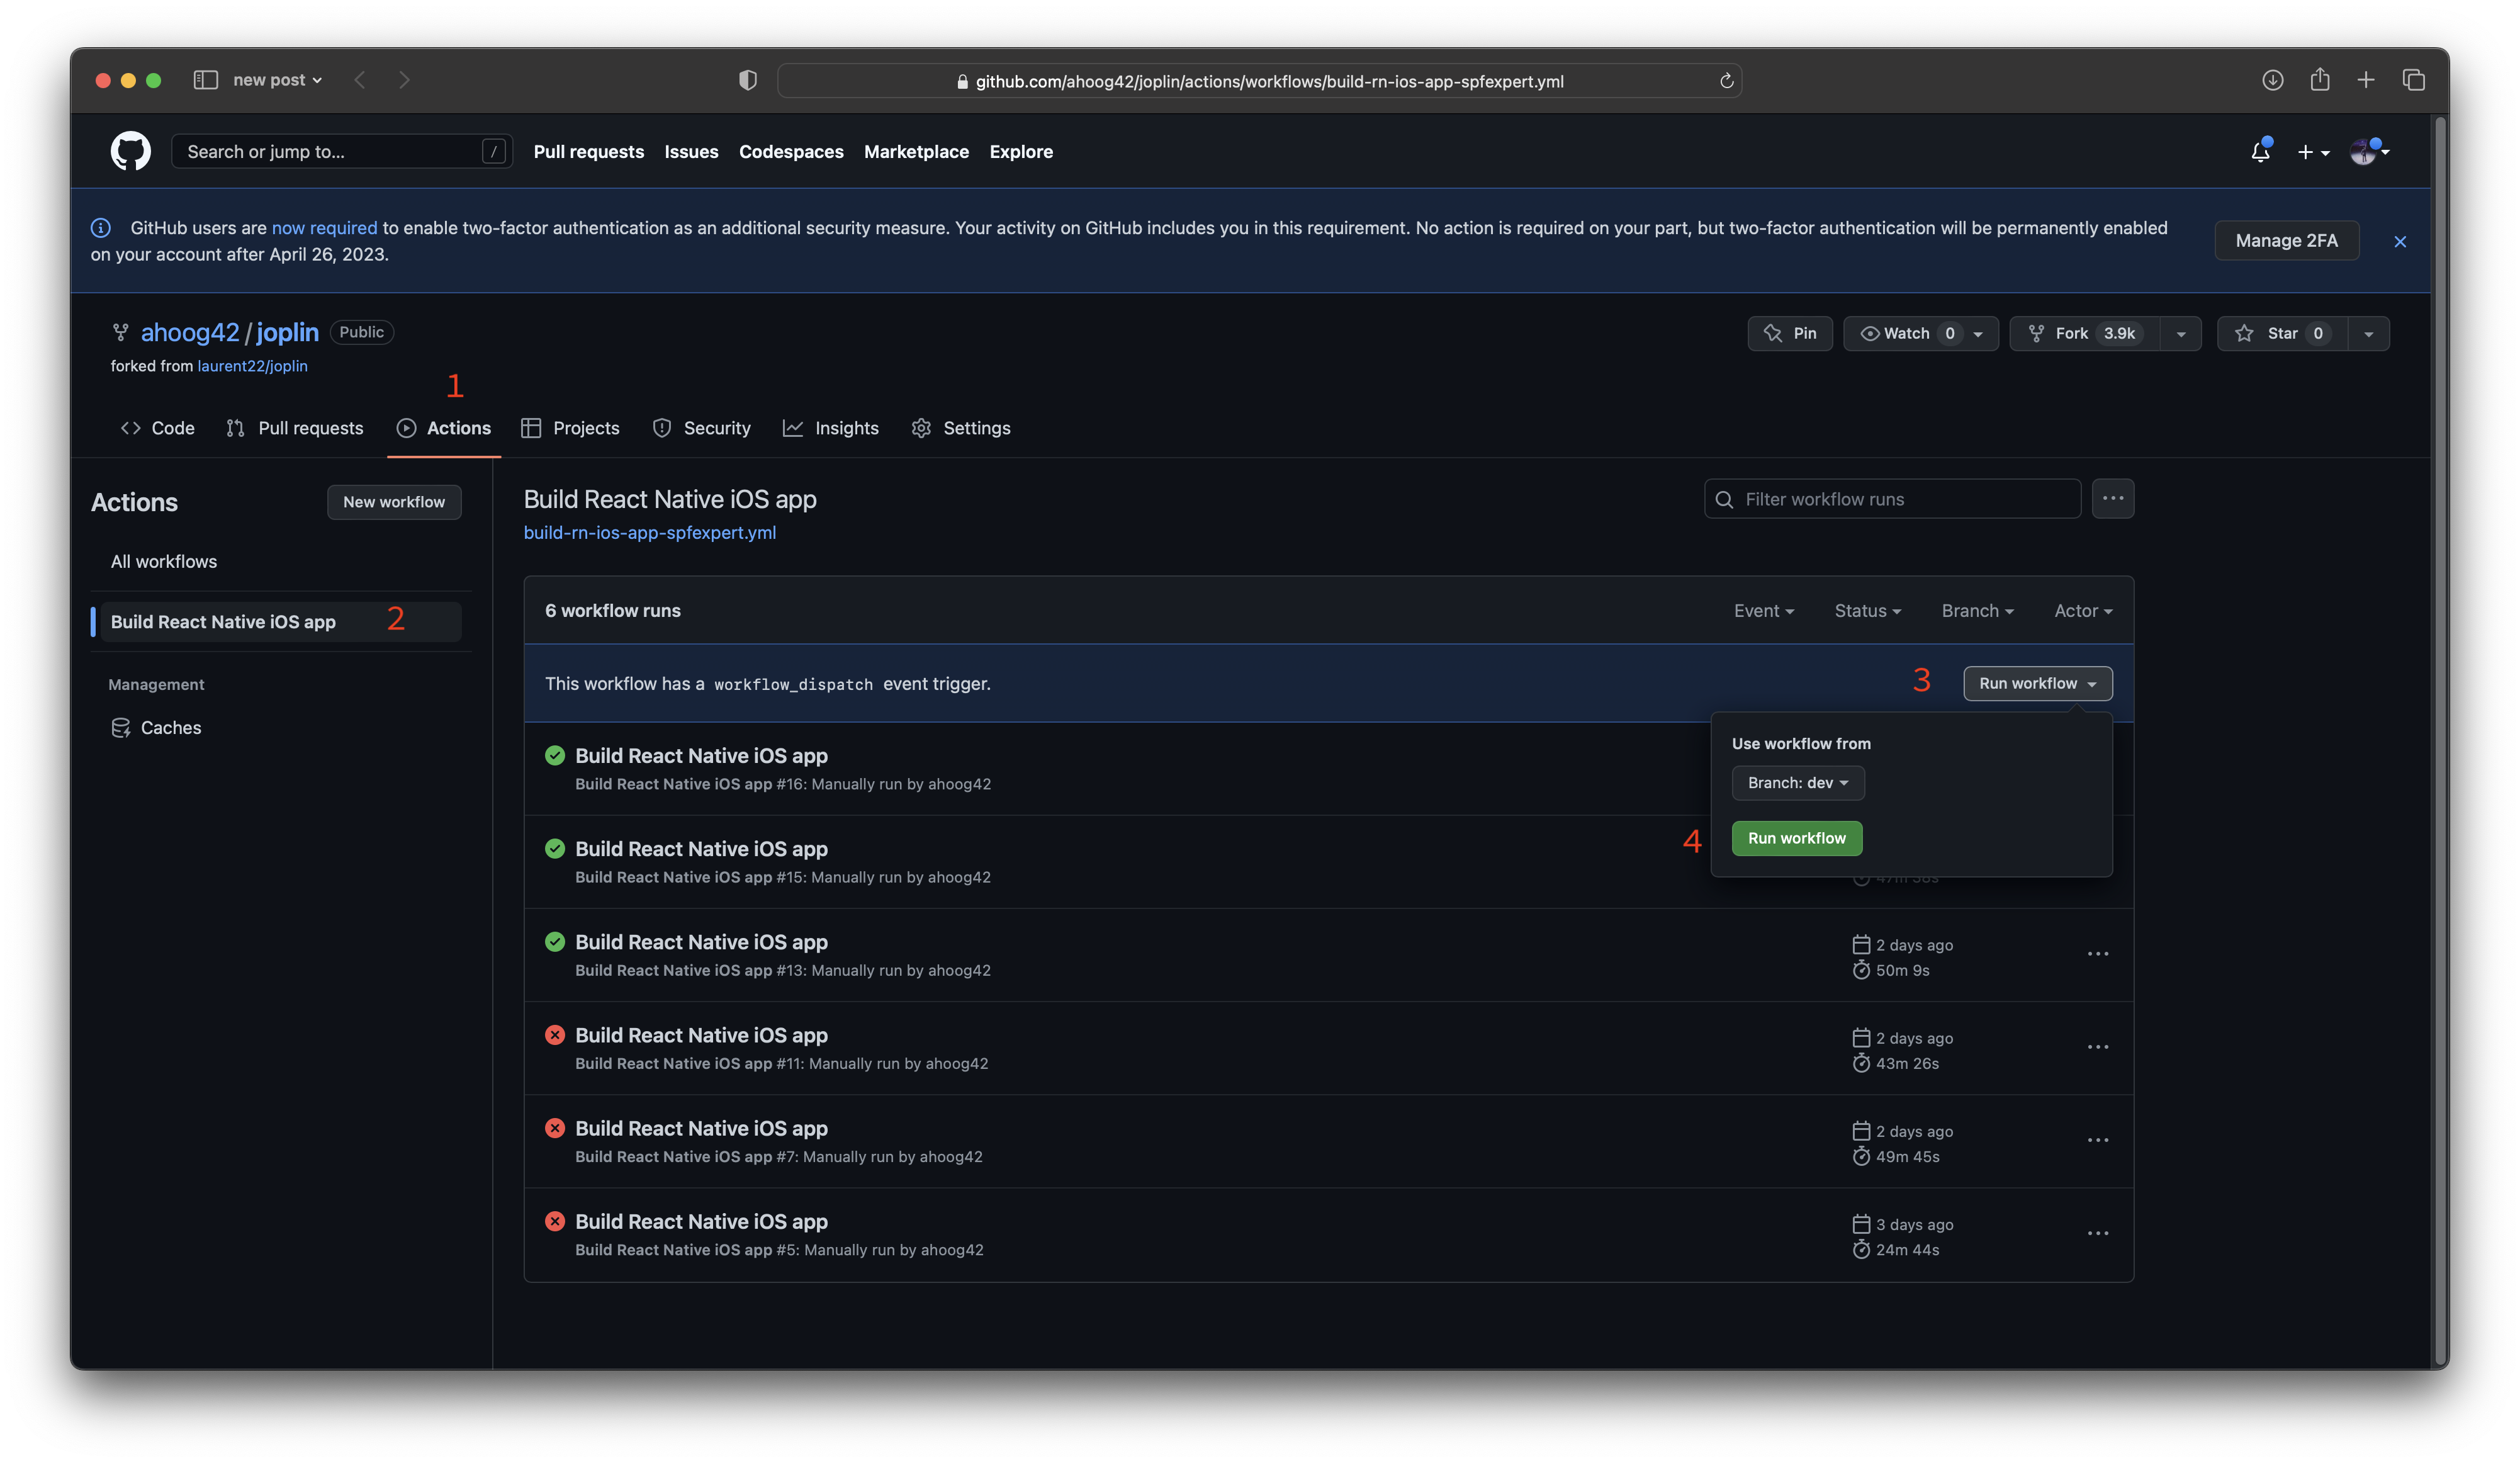
Now you can kick off the build action by going to the GitHub repo web UI and clicking Actions -> Build React Native iOS app -> Run Workflow (on the right) and hitting the green “Run Workflow” button:
Troubleshooting
Many build failed in the making of this post! Below are the various error messages I received as well as links to the section above that resoled the issue:
Missing provisioning profile for ShareExtension
Based on my initial foray into building iOS apps with GitHub Actions, I was under the impression that a single provisioning profile would do the trick. My first hint that I was very wrong was the failed build message:
/Users/runner/work/joplin/joplin/packages/app-mobile/ios/Joplin.xcodeproj: error: No profiles for 'com.andrewhoog.net.cozic.joplin.ShareExtension' were found: Xcode couldn't find any iOS App Development provisioning profiles matching 'com.andrewhoog.net.cozic.joplin.ShareExtension'. Automatic signing is disabled and unable to generate a profile. To enable automatic signing, pass -allowProvisioningUpdates to xcodebuild. (in target 'ShareExtension' from project 'Joplin')

** ARCHIVE FAILED **

Error: Process completed with exit code 65.
which I eventually resolved by including the build profile for the ShareExtension. See bundling multiple mobile provisioning profiles for additional details, including a tip on how to determine which profiles are used by Xcode during the automatic signing process.
No iOS Distribution signing certificate found
Next I (eventually) realized that I didn’t just need my Development signing certificate, I also needed my distribution signing certificate. After so research, I realized I could exports multiple certificates at once which simplified the process. Check out exporting multiple certificates in a single step section above. The error messages for this issue were:
error: exportArchive: No signing certificate "iOS Distribution" found

Error Domain=IDECodesignResolverErrorDomain Code=1 "No signing certificate "iOS Distribution" found" UserInfo={IDEDistributionIssueSeverity=3, NSLocalizedRecoverySuggestion=No "iOS Distribution" signing certificate matching team ID "XW66E6M5N4" with a private key was found., IDEProvisioningError_UserInfoKey_IDEProvisioningErrorSpecifier=iOS Distribution, NSLocalizedDescription=No signing certificate "iOS Distribution" found, IDEProvisioningError_UserInfoKey_IDEProvisioningErrorPlatform=com.apple.platform.iphoneos, IDEProvisioningError_UserInfoKey_IDEProvisioningErrorAction=5, IDEProvisioningError_UserInfoKey_IDEProvisioningErrorTeam=<IDEProvisioningBasicTeam: 0x6000025d23c0; teamID='XW66E6M5N4', teamName='(null)'>}

** EXPORT FAILED **

Error: Process completed with exit code 70.
Unable to use automatic provisioning updates
When I realized that Xcode can automatically handling signing, I figured that might just work as well in my GitHub Action macOS runner. So I took the advice from xcodebuild output and added
-allowProvisioningUpdates to the workflow yaml.
Well, that doesn’t work! Here’s what I got:
error: exportArchive: There are no accounts registered with Xcode.

** EXPORT FAILED **

Error Domain=IDEProvisioningErrorDomain Code=25 "There are no accounts registered with Xcode." UserInfo={IDEDistributionIssueSeverity=3, NSLocalizedDescription=There are no accounts registered with Xcode., NSLocalizedRecoverySuggestion=Add your developer account to Xcode}

Error: Process completed with exit code 70.
I was still hopeful and thought about trying to add an App Store Connect API token as some articles suggested but that seemed to be taking me down the wrong path. In the end, I ended up simplifying deployment by:
- 2.1 Exporting multiple certificates in a single step
- 2.2 Manually create distribution provisioning profiles
- 3.1 Bundling multiple mobile provisioning profiles
and then deploying these to the macOS runner in the workflow.