How to build an iOS app with GitHub Actions [2023]
Building on my previous “How to build an iOS app archive via command line” post, let’s now automate the process using GitHub Actions! There are a number of mobile CI/CD capabilities out there such as BitRise, CodeMagic, Jenkins, CircleCI and even Xcode Cloud but there are a lot of advantages to handling CI/CD directly in GitHub including (to name a few):
- Already has access to source code
- Native developer experience
- Managing your CI/CD configuration in a source controlled yaml file
- GitHub Marketplace is open and has a massive number of integrations and helpful actions
When I first embarked on this technical how to, I have to admit it was pretty overwhelming. But along the way, I stumbled across an article from GitHub (see below) that all the difference. Combining that with my command line post linked above and my how to export an Ad Hoc iOS ipa using Xcode (for the certificate, provisioning profile and ExportOptions.plist) made the process pretty straightforward.
Here’s the general outline we’ll follow:
1. Code Setup
If you want to follow along with my “hello world” iOS app, make sure you follow the code setup from the previous post to download the source code to your computer. Obviously just use your iOS app if you have one in mind! Also, the post assumes you have already exported the app archive at least once from Xcode.
2. Configuration inputs
As discussed in the post on building from command line, there are a number of files and parameter you have to manually handle vs. a Xcode managed workflow. For the GitHub Action, we will need:
- Signing certificate (and a strong password to protect it)
- Mobile provisioning profile for the app
- Keychain password for the build machine
- ExportOptions.plist
There are plenty of blogs that step you through the process of creating the first three items manually in Apple’s Developer Portal so feel free to check them out. But I’m lazy and realized that Xcode already did all of this for me so I could simple reuse what was already configured (ymmv)!
To simplify access to these inputs, please all the files in a single folders, e.g.:
$ mkdir -p ~/spfexpert/ios-deploy && cd $_
2.1 Signing certificate
Since you’ve already built your app in Xcode, you can simple run Keychain Access (just do a Spotlight Search by hitting ⌘-Space) and do the following:
- Select login on left “Default Keychains” panel
- Select “My Certificates” from horizontal navigation
- Right-click your certificate and select “Export…”
- Choose your location (
~/spfexpert/ios-deploy) and file name (defaults toCertificates.p12) - Enter strong password to protect the certificate
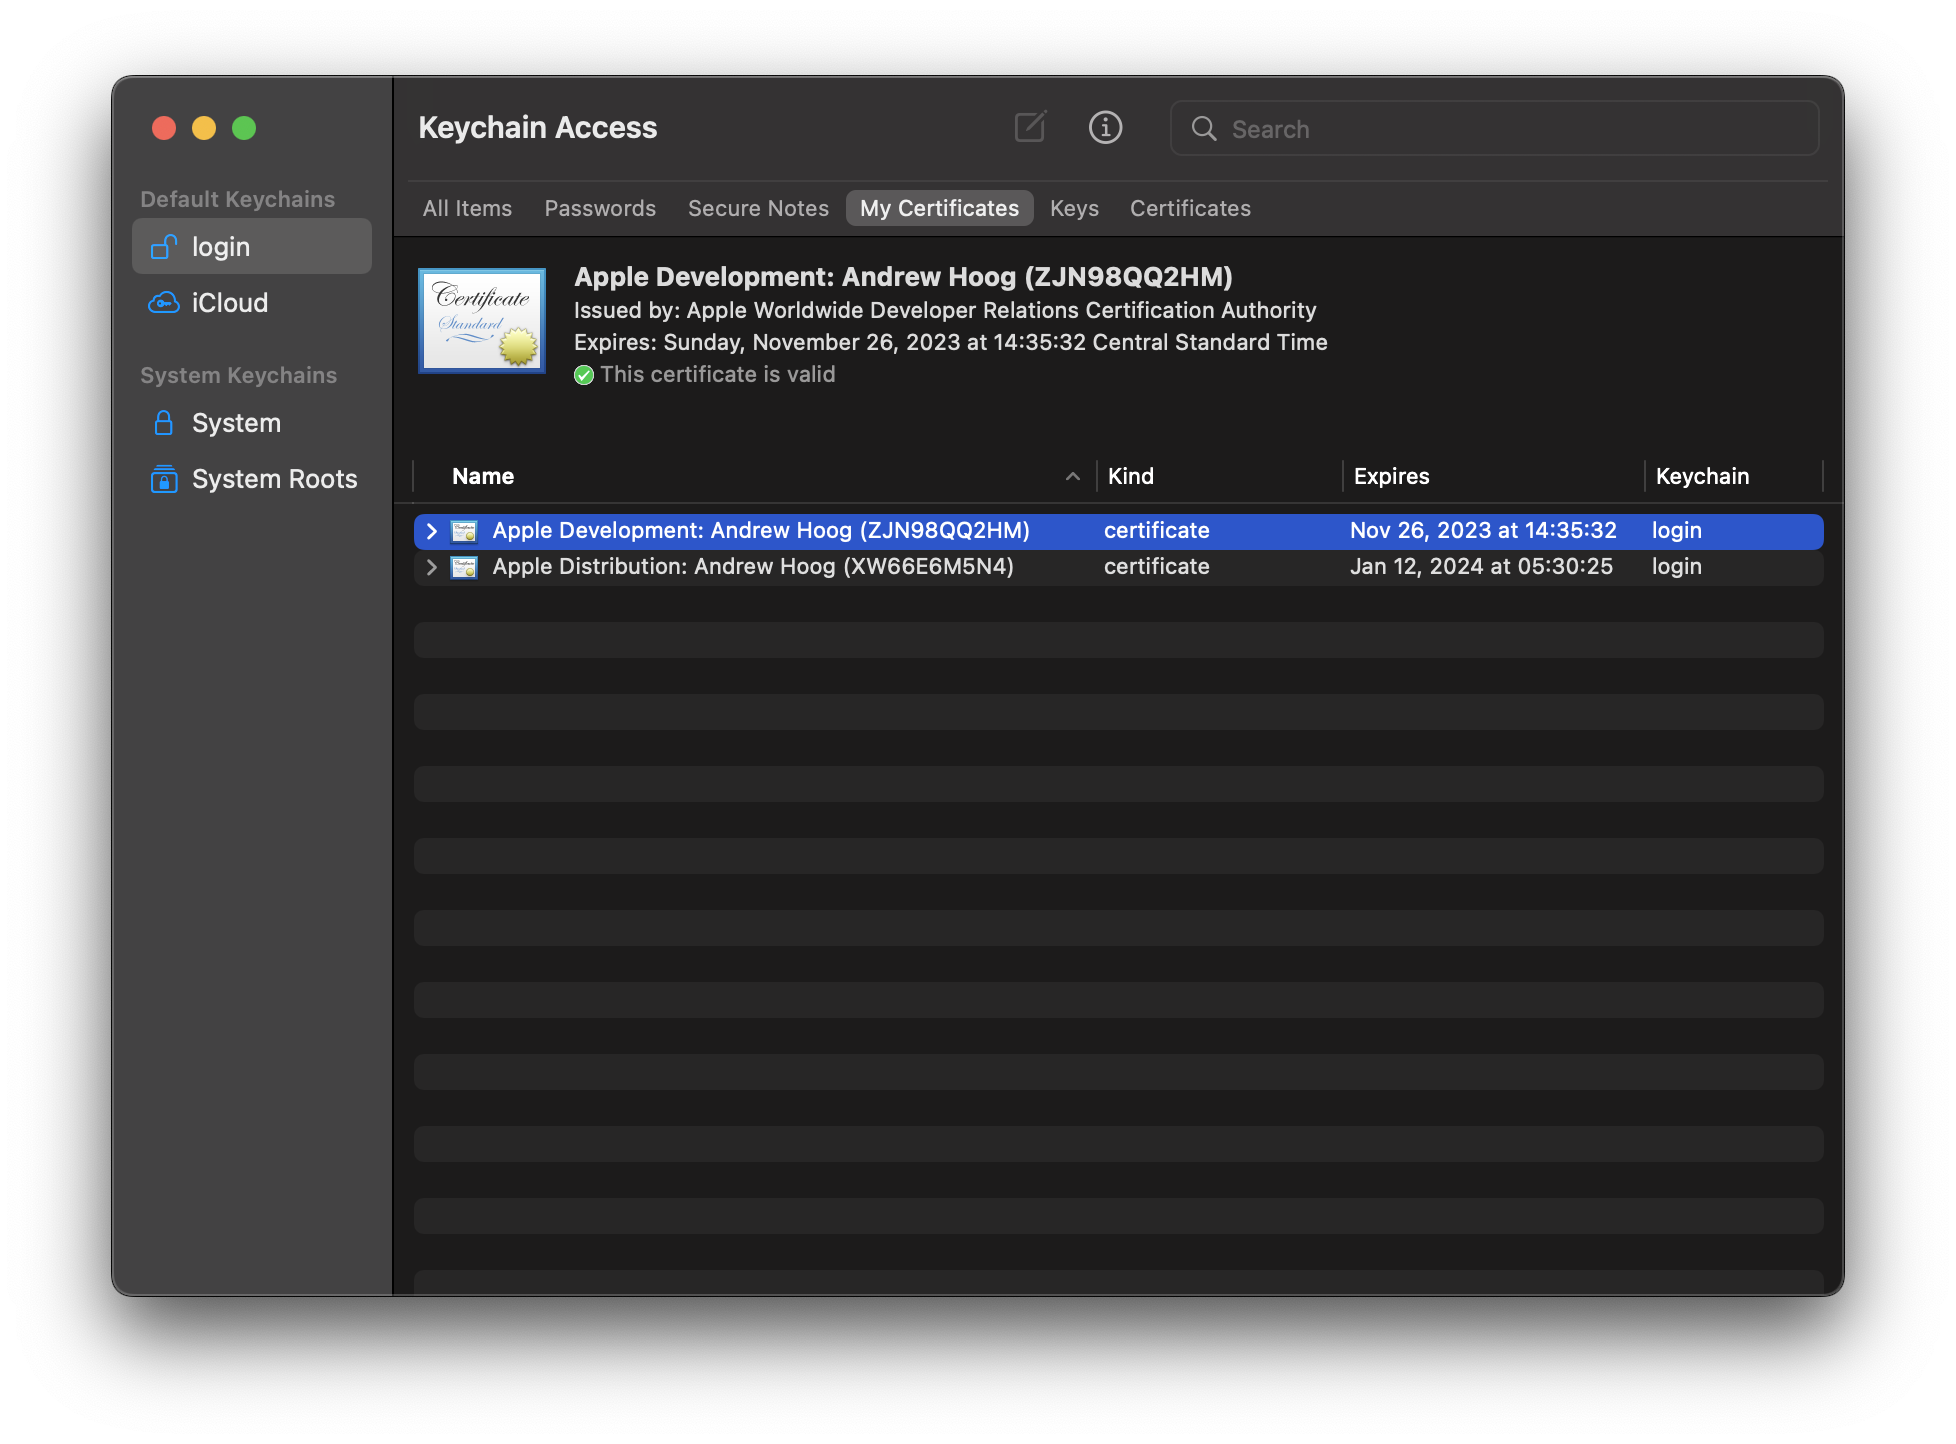
Tip: finding the correct signing certificate and provisioning profile
If you’re just starting out with iOS development, it’s likely you might have just a single certificate. As you can tell above, I have two certificates and while working on the Github Action, I chose the wrong certificate multiple times! One way to figure out the appropriate certificate to build the app from the command line on your macOS and look for the CodeSign output in logs, e.g.:
CodeSign /Users/hiro/Library/Developer/Xcode/DerivedData/I_am_Groot-gfxpkzbpazztxzabhewsezcfrozd/Build/Products/Debug-iphoneos/I\ am\ Groot.app (in target 'I am Groot' from project 'I am Groot')
    cd /Users/hiro/spfexpert/iamgroot

    Signing Identity:     "Apple Development: Andrew Hoog (ZJN98QQ2HM)"
    Provisioning Profile: "iOS Team Provisioning Profile: *"
                          (1d0e8da1-9eba-41c7-a308-931ba380c3b0)
Once I saw this, it was obvious that I needed the first certificate in Keychain Access!
2.2 Mobile provisioning profile for the app
The next item we need is the mobile provisioning profile. Using the little hack of looking at the CodeSign output from a command line build, we can see which provisioning profile Xcode used. The provisioning profiles are stored on your macOS at ~/Library/MobileDevice/Provisioning\ Profiles so you can simple copy the appropriate files as follows:
$ cp ~/Library/MobileDevice/Provisioning\ Profiles/1d0e8da1-9eba-41c7-a308-931ba380c3b0.mobileprovision ~/spfexpert/ios-deploy/
2.3 Keychain password for the build machine
The last step is just to create a password you will use to setup and add data to the GitHub Action macOS runner’s Keychain. You can use whatever technique you like but I’ve been a huge fan of of zx2c4’s password-store for many years now and generate the password as follows:
hiro@sophon:~/spfexpert|⇒  pass generate temp/temp 18
An entry already exists for temp/temp. Overwrite it? [y/N] y
[master 7159eaa] Add generated password for temp/temp.
 1 file changed, 0 insertions(+), 0 deletions(-)
 rewrite temp/temp.gpg (100%)
The generated password for temp/temp is:
w*cp,k.To~A^-g@MK-
Since there are temporary passwords for me, I just overwrite it.
2.4 ExportOptions.plist
This is a required configuration that you could create manually but is saved by Xcode when you archive an app. I’ve already documented how to snag this file so review that post for more details. So assuming you’ve exported your iOS app archive to ~/spfexpert/iamgroot/build, you could copy the ExportOptions.plist as follows:
$ cp ~/spfexpert/iamgroot/build/ExportOptions.plist ~/spfexpert/ios-deploy
3. Repository secrets setup
Now we have all the information we need to configure the GitHub Action to export our iOS app archive. The great news is that GitHub has an fantastic doc that gives us the exact workflow steps we need to follow.
To protect the sensitive configuration data, the values from above will be stored as repository secrets which will require us to serialize the data using base64. In other blogs, some folks take the additional steps of encrypting the config data with gpg however I do not believe this provides sufficient additional security. But certainly feel free to add the additional layer if you like but recognize that the passcode for gpg will also be stored as a repository secret so if that layer is every compromised, it won’t provide any additional protection.
We’ll pipe the output of base64 into pbcopy so it’s simple to then paste the resulting base64 data into your GitHub repository secrets.
First, in your repo on github.com, navigate to Settings -> Secrets -> Actions (e.g. https://github.com/ahoog42/iamgroot/settings/secrets/actions) and then click the green “New repository secret” button:
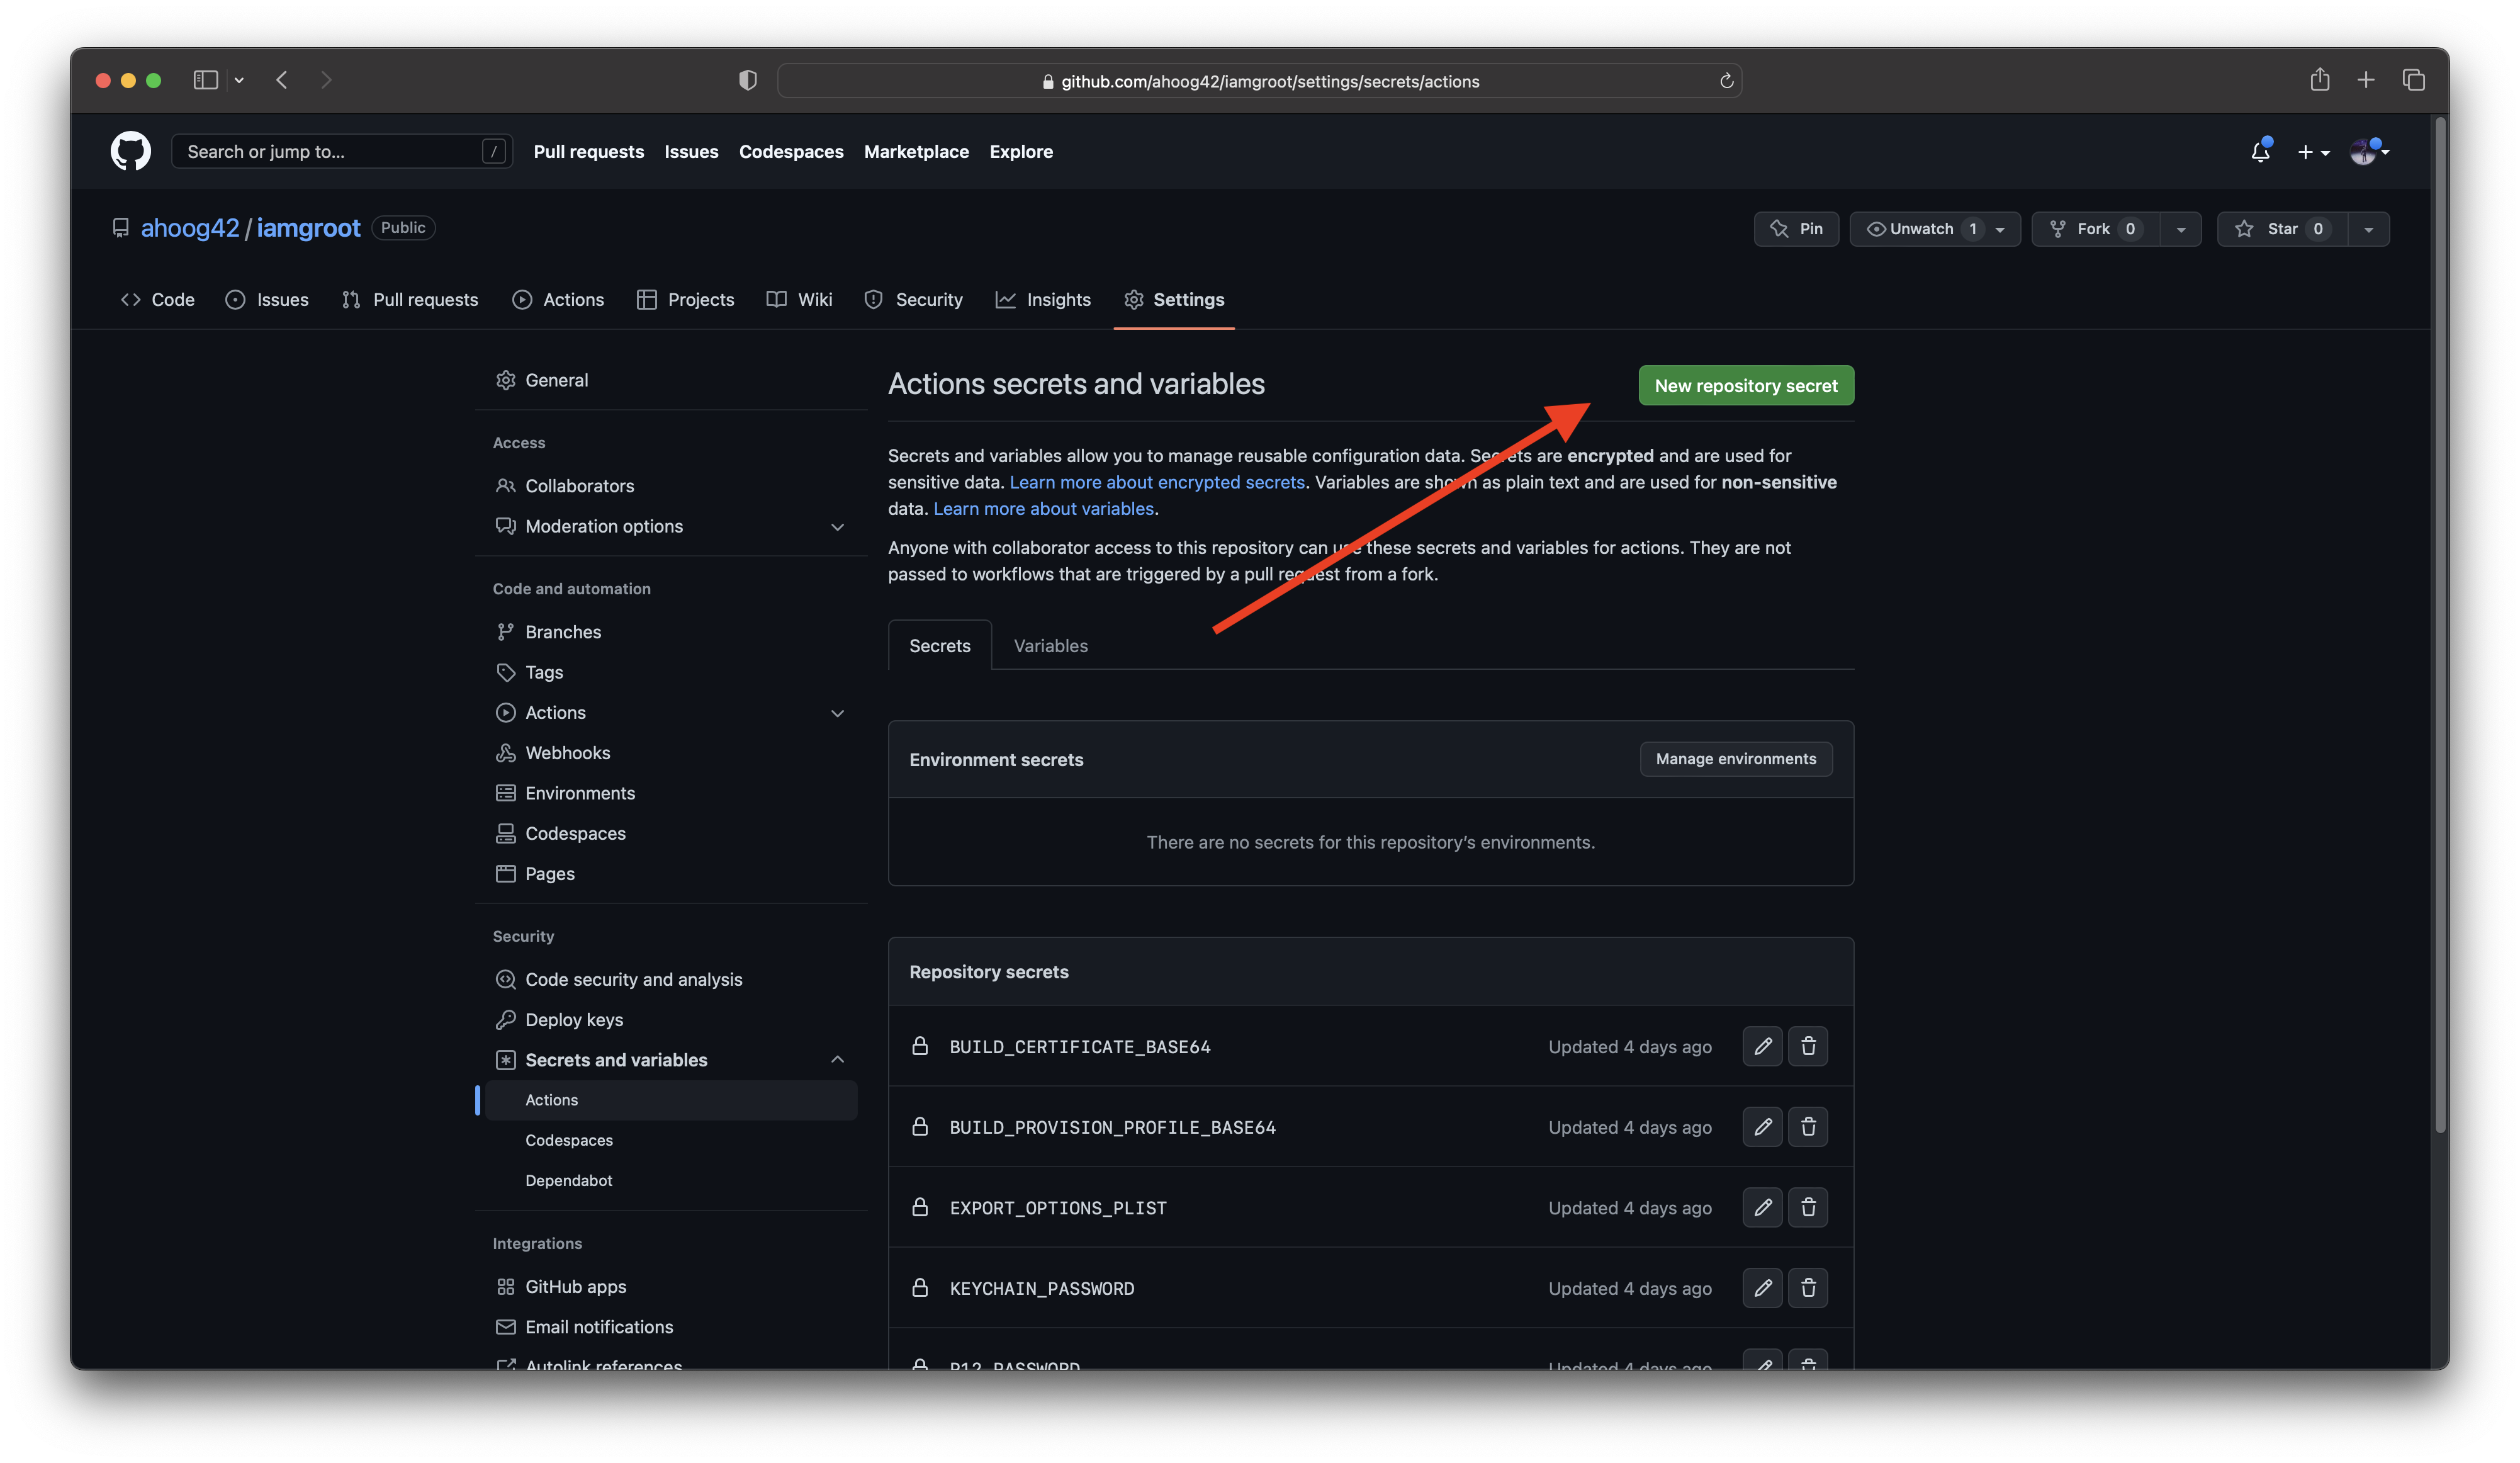 From here, we’ll create new 5 repository secrets with the Name (from the heading) and then Secret as follows:
3.1 BUILD_CERTIFICATE_BASE64
Base64 the signing certificate and pipe it to the clipboard:
$ base64 -i Certificates.p12| pbcopy
and then paste the clipboard contents (⌘-V) into the textbox labeled Secret.
3.2 P12_PASSWORD
Copy the password you used to export your signing certificate to the clipboard, e.g.
$ pass -c personal/apple/certs/XW66E6M5N4
and then paste the clipboard contents (⌘-V) into the textbox labeled Secret.
3.3 BUILD_PROVISION_PROFILE_BASE64
Base64 the mobile provisioning profile and pipe it to the clipboard:
$ base64 -i 1d0e8da1-9eba-41c7-a308-931ba380c3b0.mobileprovision| pbcopy
and then paste the clipboard contents (⌘-V) into the textbox labeled Secret.
3.4 KEYCHAIN_PASSWORD
Copy the password you created for macOS runner’s Keychain to the clipboard, e.g.
$ pass -c temp/temp
and then paste the clipboard contents (⌘-V) into the textbox labeled Secret.
3.5 EXPORT_OPTIONS_PLIST
And finally base64 the ExportOptions.plist file and pipe it to the clipboard:
$ base64 -i ExportOptions.plist| pbcopy
and then paste the clipboard contents (⌘-V) into the textbox labeled Secret.
4. GitHub Action workflow
We’ll then practically copy/paste the example yaml workflow file from the GitHub docs and then add in your build steps.
First, let’s create the workflow file:
$ cd ~/spfexpert/iamgroot && cd $_
$ mkdir -p .github/workflows
$ touch .github/workflows/build-ios-app-spfexpert.yml
and then copy the content of this yaml file into newly created workflow file:
name: "Build iOS app"

on:
  # manual trigger but change to any supported event
  # see addl: https://www.andrewhoog.com/post/how-to-build-react-native-android-app-with-github-actions/#3-run-build-workflow
  workflow_dispatch:
    branches: [main]

jobs:
  build_with_signing:
    runs-on: macos-latest
    steps:
      # this was more debug as was curious what came pre-installed
      # GitHub shares this online, e.g. https://github.com/actions/runner-images/blob/macOS-12/20230224.1/images/macos/macos-12-Readme.md
      - name: check Xcode version
        run: /usr/bin/xcodebuild -version

      - name: checkout repository
        uses: actions/checkout@v3

      - name: Install the Apple certificate and provisioning profile
        env:
          BUILD_CERTIFICATE_BASE64: ${{ secrets.BUILD_CERTIFICATE_BASE64 }}
          P12_PASSWORD: ${{ secrets.P12_PASSWORD }}
          BUILD_PROVISION_PROFILE_BASE64: ${{ secrets.BUILD_PROVISION_PROFILE_BASE64 }}
          KEYCHAIN_PASSWORD: ${{ secrets.KEYCHAIN_PASSWORD }}
        run: |
          # create variables
          CERTIFICATE_PATH=$RUNNER_TEMP/build_certificate.p12
          PP_PATH=$RUNNER_TEMP/build_pp.mobileprovision
          KEYCHAIN_PATH=$RUNNER_TEMP/app-signing.keychain-db

          # import certificate and provisioning profile from secrets
          echo -n "$BUILD_CERTIFICATE_BASE64" | base64 --decode -o $CERTIFICATE_PATH
          echo -n "$BUILD_PROVISION_PROFILE_BASE64" | base64 --decode -o $PP_PATH

          # create temporary keychain
          security create-keychain -p "$KEYCHAIN_PASSWORD" $KEYCHAIN_PATH
          security set-keychain-settings -lut 21600 $KEYCHAIN_PATH
          security unlock-keychain -p "$KEYCHAIN_PASSWORD" $KEYCHAIN_PATH

          # import certificate to keychain
          security import $CERTIFICATE_PATH -P "$P12_PASSWORD" -A -t cert -f pkcs12 -k $KEYCHAIN_PATH
          security list-keychain -d user -s $KEYCHAIN_PATH

          # apply provisioning profile
          mkdir -p ~/Library/MobileDevice/Provisioning\ Profiles
          cp $PP_PATH ~/Library/MobileDevice/Provisioning\ Profiles

      - name: build archive
        run: |
          xcodebuild -scheme "I am Groot" \
          -archivePath $RUNNER_TEMP/iamgroot.xcarchive \
          -sdk iphoneos \
          -configuration Debug \
          -destination generic/platform=iOS \
          clean archive

      - name: export ipa
        env:
          EXPORT_OPTIONS_PLIST: ${{ secrets.EXPORT_OPTIONS_PLIST }}
        run: |
          EXPORT_OPTS_PATH=$RUNNER_TEMP/ExportOptions.plist
          echo -n "$EXPORT_OPTIONS_PLIST" | base64 --decode -o $EXPORT_OPTS_PATH
          xcodebuild -exportArchive -archivePath $RUNNER_TEMP/iamgroot.xcarchive -exportOptionsPlist $EXPORT_OPTS_PATH -exportPath $RUNNER_TEMP/build

      - name: Upload application
        uses: actions/upload-artifact@v3
        with:
          name: app
          path: ${{ runner.temp }}/build/I\ am\ Groot.ipa
          # you can also archive the entire directory
          # path: ${{ runner.temp }}/build
          retention-days: 3
You will need to modify the “build archive” and “export ipa” command slightly if you’re not using my “I am Groot” example app so they are consistent with your scheme, configuration, etc.
As in my other examples, I also choose to upload the app so I could use it in a later step or even download via GitHub’s REST API.
After you have the .yml configured for you app, commit to your repo with appropriate comment:
$ git commit .github/workflows/build-ios-app-spfexpert.yml -m 'GitHub Action to export iOS app ipa'
$ git push
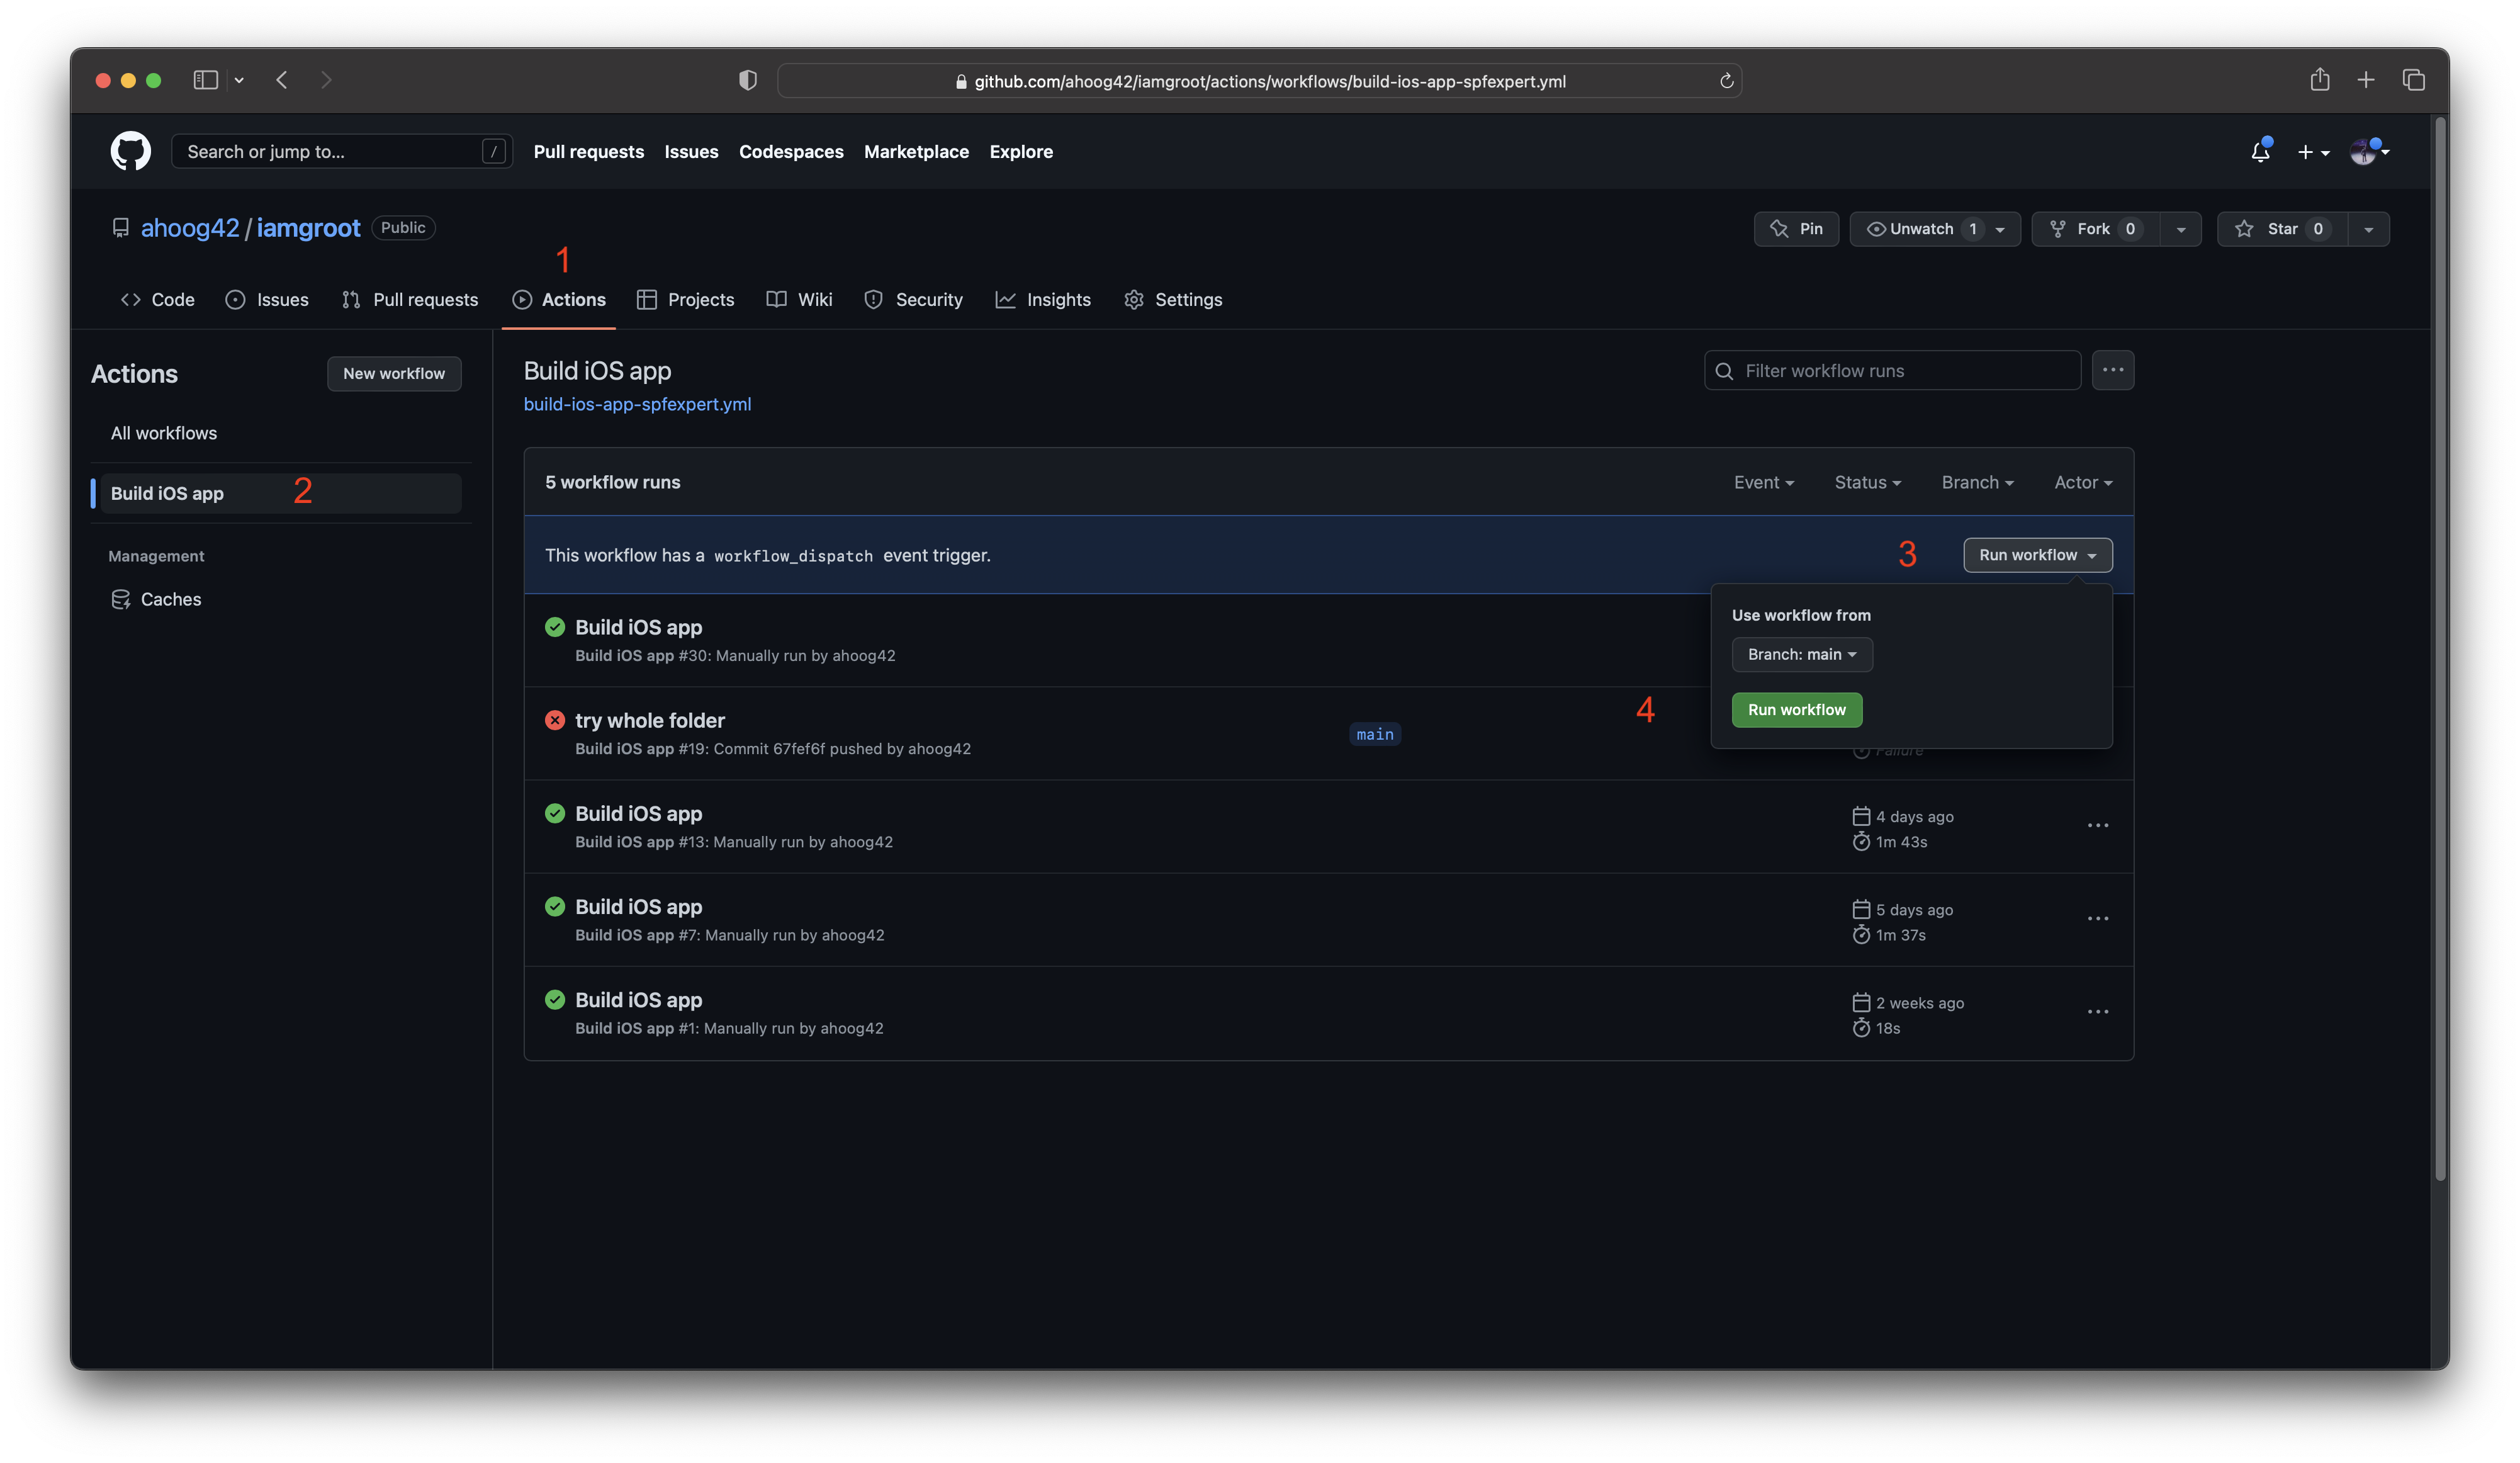
then test it out by going to the GitHub repo web UI and clicking Actions -> Build iOS App -> Run Workflow (on the right) and hitting the green “Run Workflow” button:
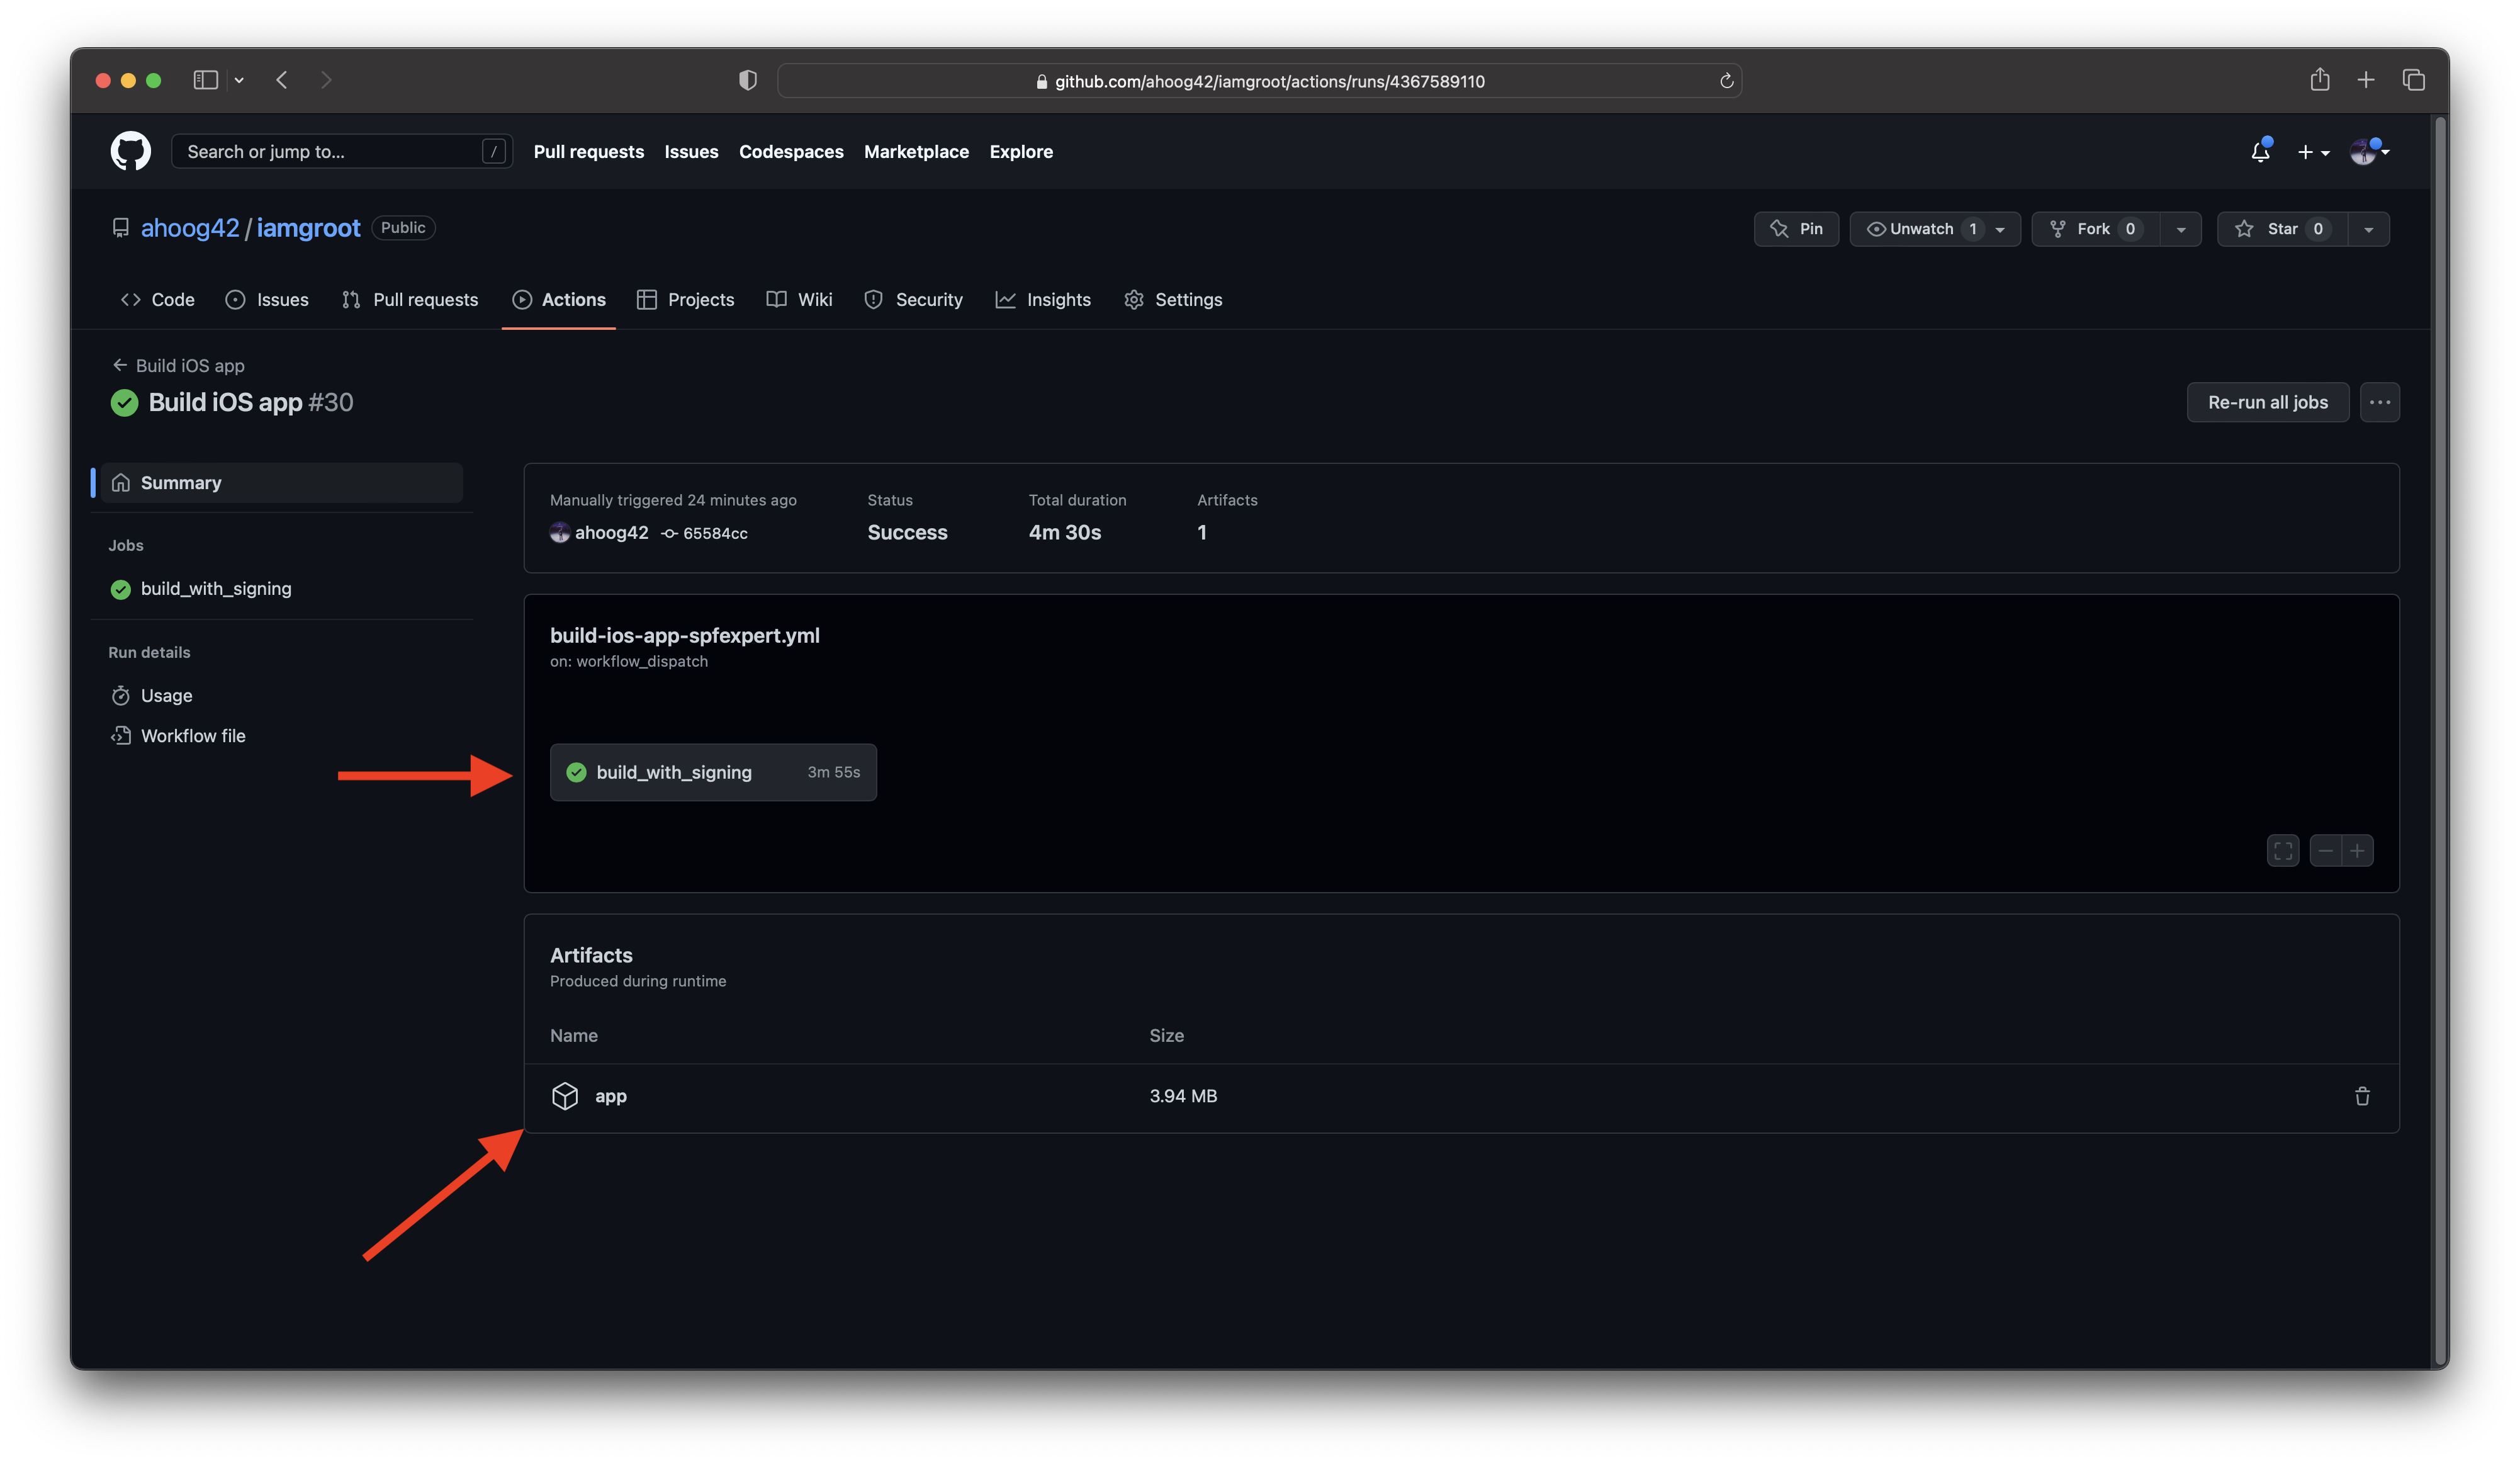
You can then click on the job name to see the output of the GitHub Action steps and also download the app artifact:
 You can also download the app via GitHub’s REST API
Errors encountered
Along the way, I would consistently receive errors like the following:
/Users/runner/work/iamgroot/iamgroot/I am Groot.xcodeproj: error: No profiles for 'com.andrewhoog.I-am-Groot2' were found: Xcode couldn't find any iOS App Development provisioning profiles matching 'com.andrewhoog.I-am-Groot2'. Automatic signing is disabled and unable to generate a profile. To enable automatic signing, pass -allowProvisioningUpdates to xcodebuild. (in target 'I am Groot' from project 'I am Groot')

[29](https://github.com/ahoog42/iamgroot/actions/runs/4327074763/jobs/7555274387#step:5:30)** ARCHIVE FAILED **

[30](https://github.com/ahoog42/iamgroot/actions/runs/4327074763/jobs/7555274387#step:5:31)

[31](https://github.com/ahoog42/iamgroot/actions/runs/4327074763/jobs/7555274387#step:5:32)Error: Process completed with exit code 65.
If you see errors like this, I would double check your signing certificate and mobile provision profile (see tip above).